2 Methods to Separate Date and Time in Excel
Posted on: 08/30/2024

Introduction
Welcome to our guide on how to separate date and time in Excel. In this blog, we will explore two dynamic methods to achieve this: using the Integer function and employing Power Query. These methods are perfect for analyzing data trends such as popular class times or customer purchase times.
Let's dive in and learn how to separate date and time in Excel efficiently.
Using the Integer Function
The Integer function method is a straightforward way to separate date and time in Excel. This method keeps your data dynamic, meaning any changes in the original data will automatically update the separated date and time.
YouTube Video - 2 Methods to Separate DATE and TIME in Excel
Step-by-Step Guide
First, let's look at how to use the Integer function to separate the date and time from a single field.
-
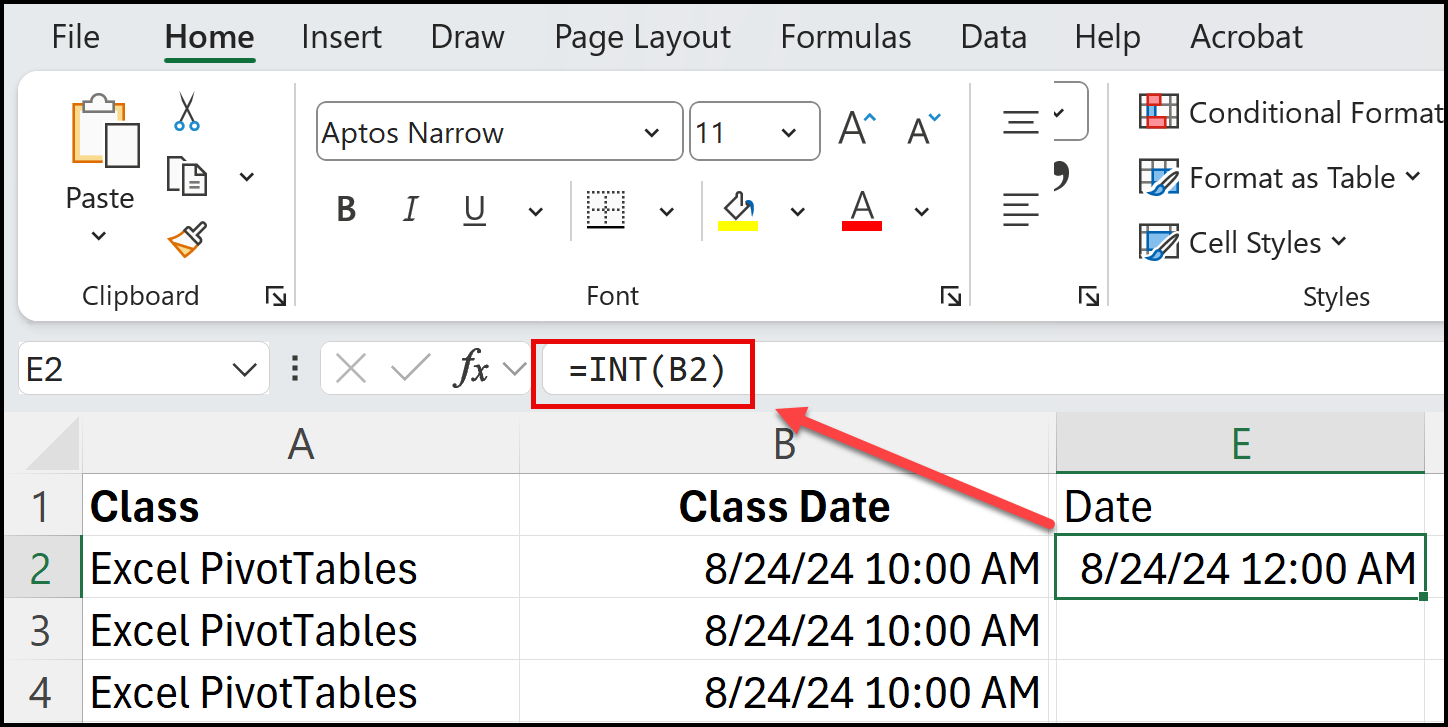
In column B, you have the class Date and Time listed. To extract the date, you will use the Integer function. In column E, type =INT(B2) and press Enter.
-
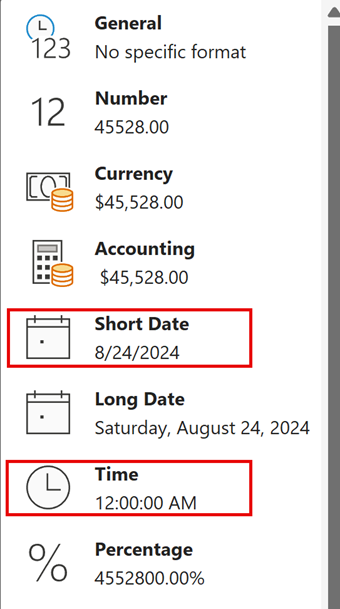
The Integer function will give you the date. To format it properly, highlight the column, go to the Home tab, and select Short Date in the Number group. This ensures the dates are displayed correctly.
-
To extract the time, use the formula =B2-INT(B2) in column F. This will leave you with just the time.
-
Highlight column F and format it as Time in the Number group. Now, you have the date and time separated.
Excel INT Function to separate date and time - get the DATE
Popular Excel Articles
-
Excel: Combining Unique and Sort functions
The UNIQUE function in Excel is one of my favorite functions. Unique returns a list of unique values in a range. The SORT function in Excel sorts the contents of a range or array.
-
Three tips for getting started with Excel Charts
Charts in Microsoft Excel are easy. This short video shows three tips for creating charts. I'll cover two keyboard shortcuts for making charts, using Recommend Charts, and creating charts using Quick Analysis.

Excel INT Function to separate date and time - get the TIME
Popular Copilot in Excel Articles
-
Copilot for Excel - Is it Accurate? 11 Tests Performed
Here's a detailed analysis of Microsoft Copilot in Excel. I delve into Copilot's functionalities with a series of tests, emphasizing its precision and capability in handling a variety of tasks within Excel.
-
Copilot in OneDrive: Revolutionizing Document Interaction
Copilot in OneDrive is here, and it promises to revolutionize how we interact with documents. With features like summarizing documents, creating FAQs, and asking questions about document content, Copilot offers a powerful toolset for enhancing productivity and efficiency.
Excel Short Date and Time when using INT Function
Analyzing Data with PivotTable
One of the main reasons to separate date and time is to analyze data trends. In our example, we want to determine the most popular time for training classes. You could also use Time to find out when most customers place orders, or any time related field.
-
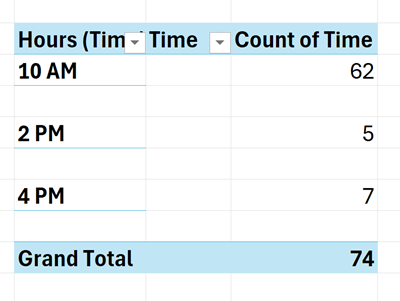
Select your data and insert a PivotTable. Drag the Time field to the Rows area and the Class Date to the Values area. This will give you a count of classes at different times.
-
The PivotTable shows that 10 AM is the most popular time, with 62 people signing up for classes.
PivotTable showing the preferred time
Using Power Query
Power Query is another excellent method to separate date and time in Excel. This method is highly dynamic and allows for easy data refreshes, making it ideal for large datasets.
Step-by-Step Guide
Let's explore how to use Power Query to separate date and time.
1. Click on your data and go to the Data tab. Select From Table/Range under the Get and Transform Data group. Power Query will launch.
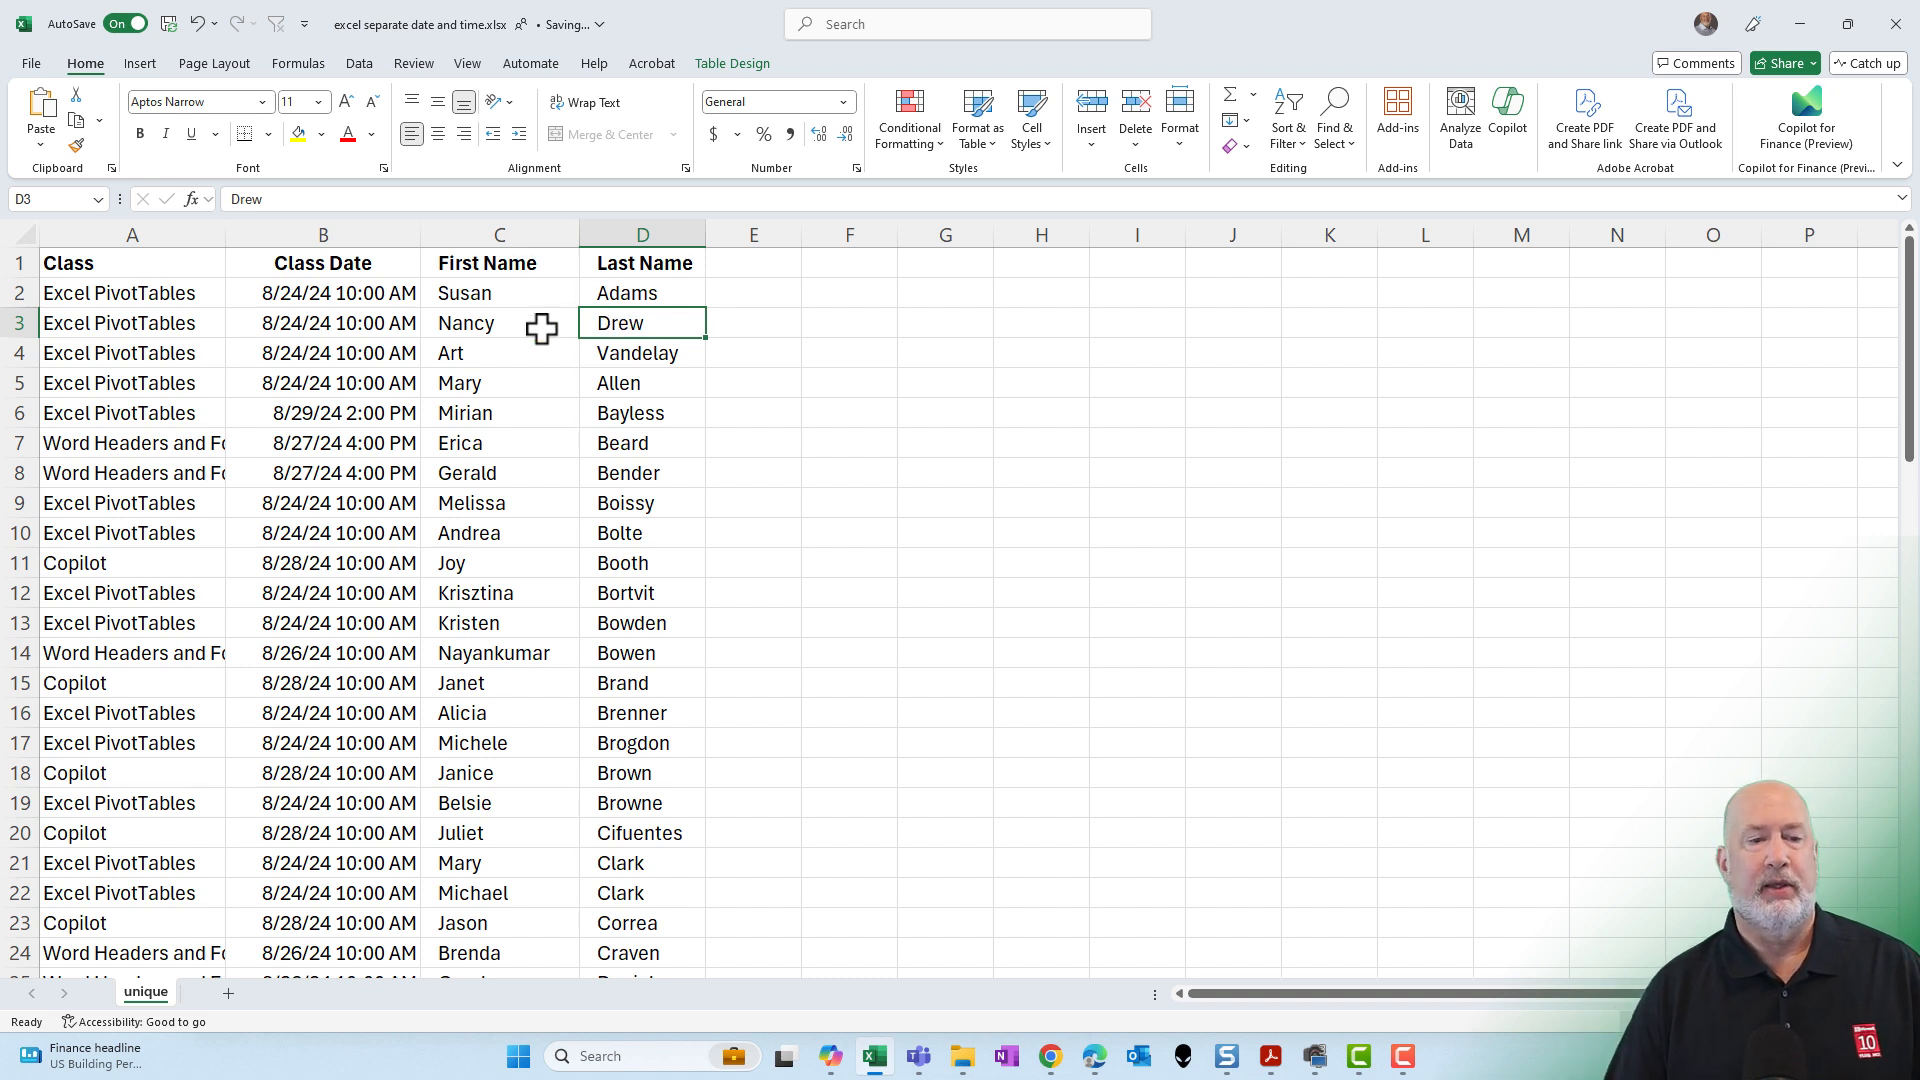
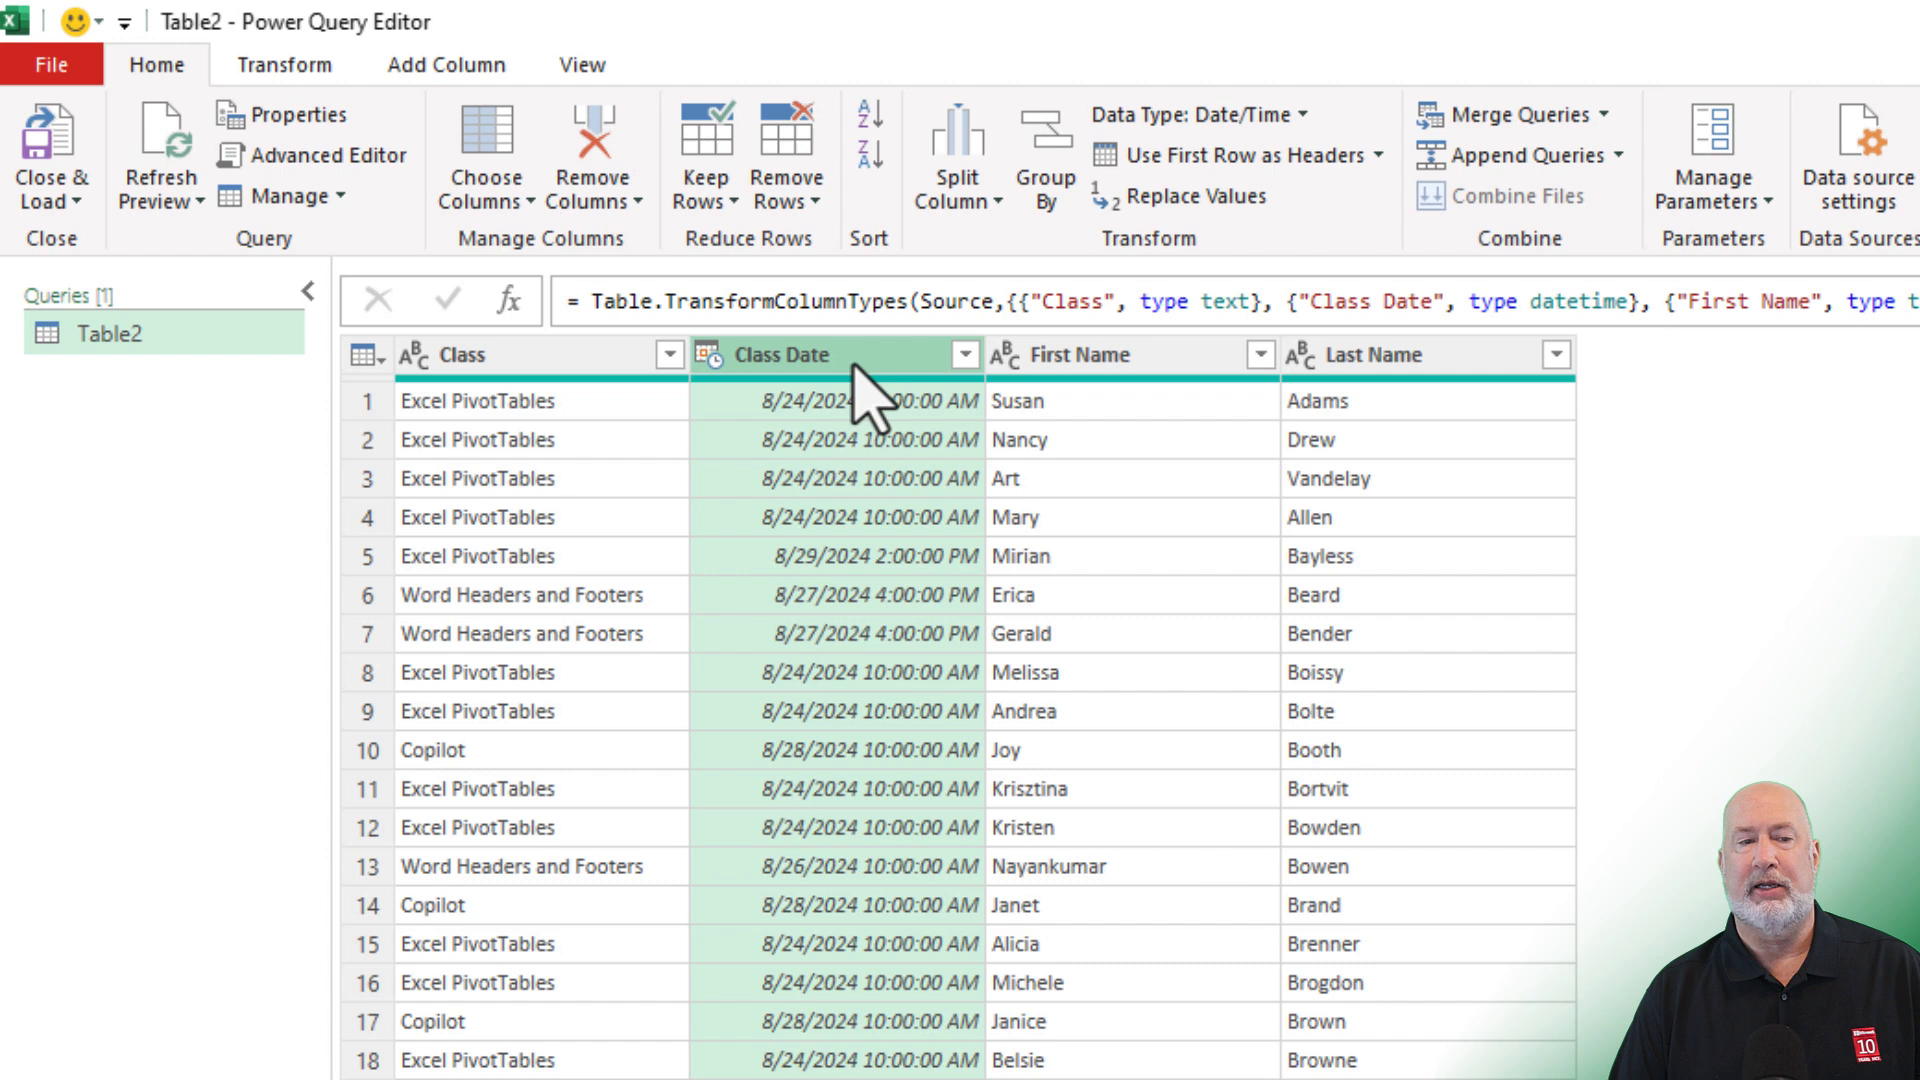
2. In Power Query, select the column with the class date. Go to the Add Column tab and choose Date Only from the Date & Time group. This will extract the date.
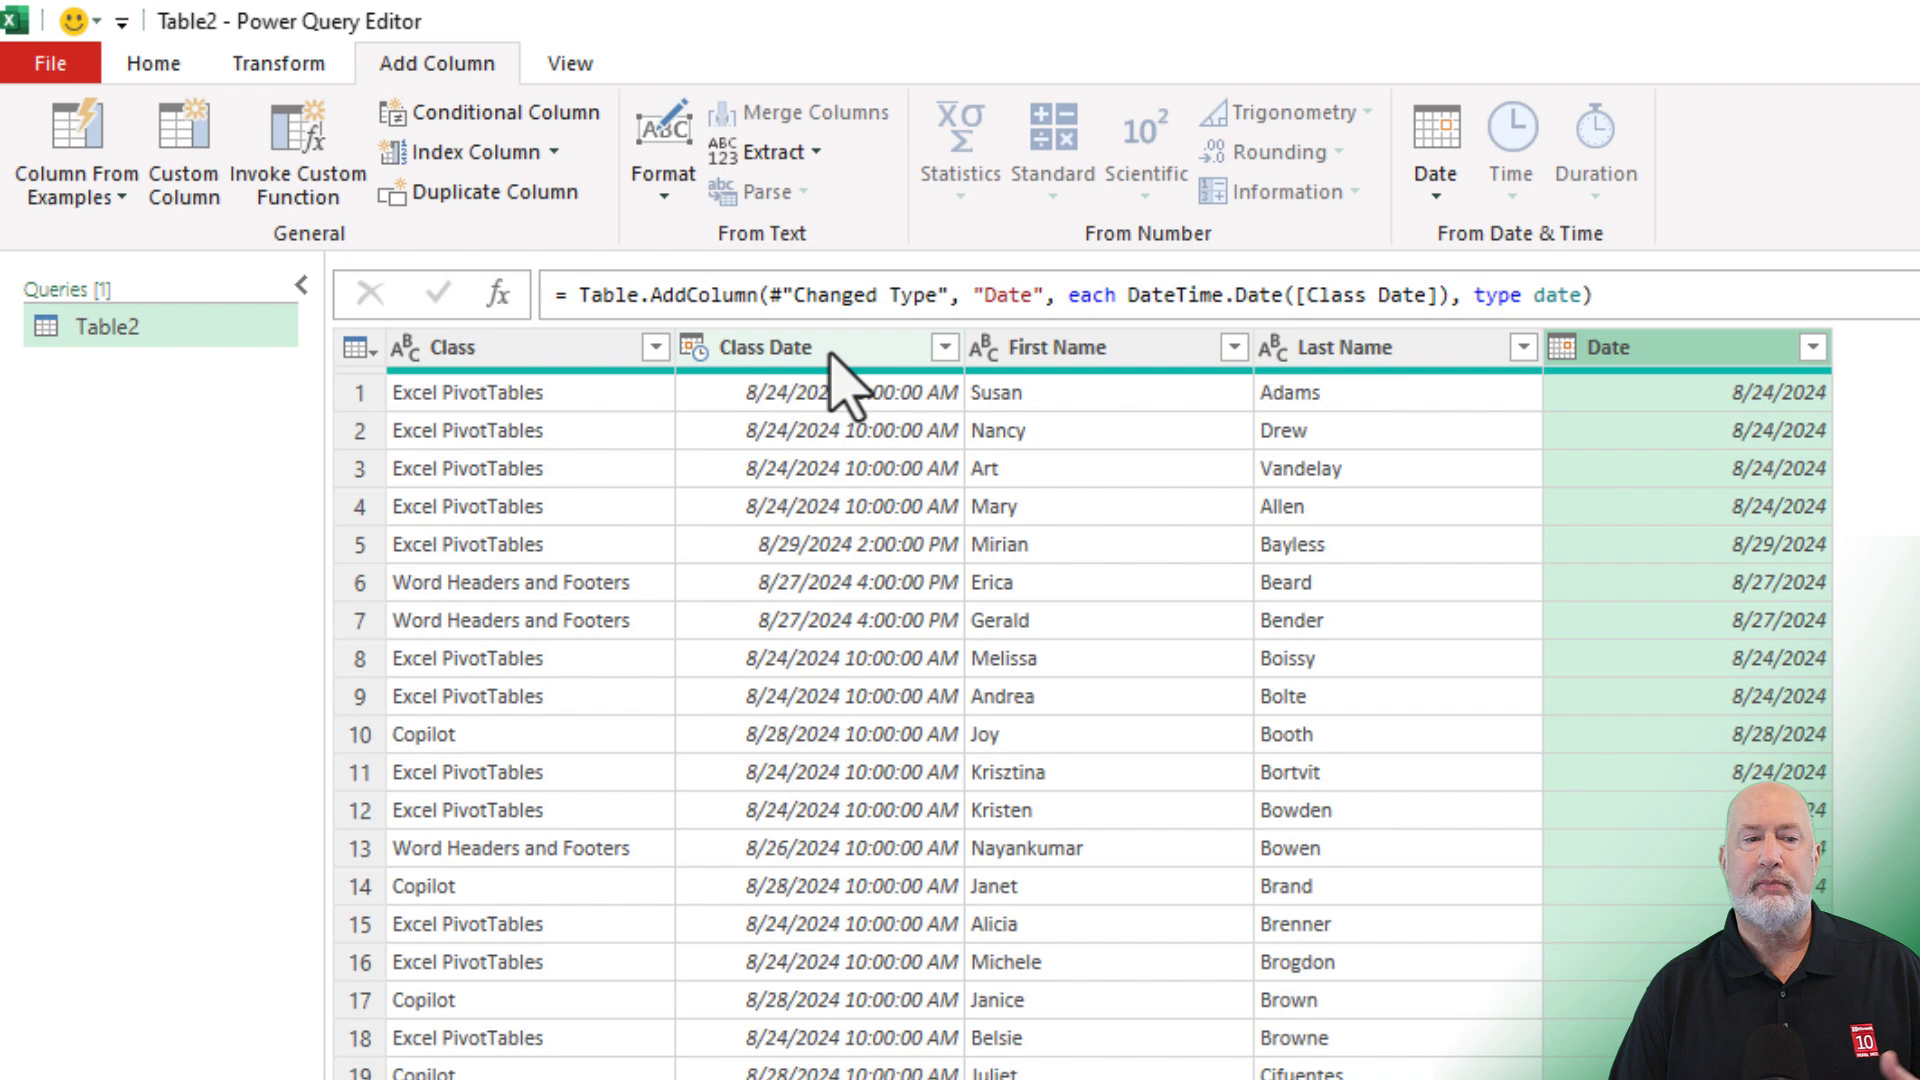
3. Repeat the process to extract the time. Select the column again, go to the Add Column tab, and choose Time Only from the Date & Time group.
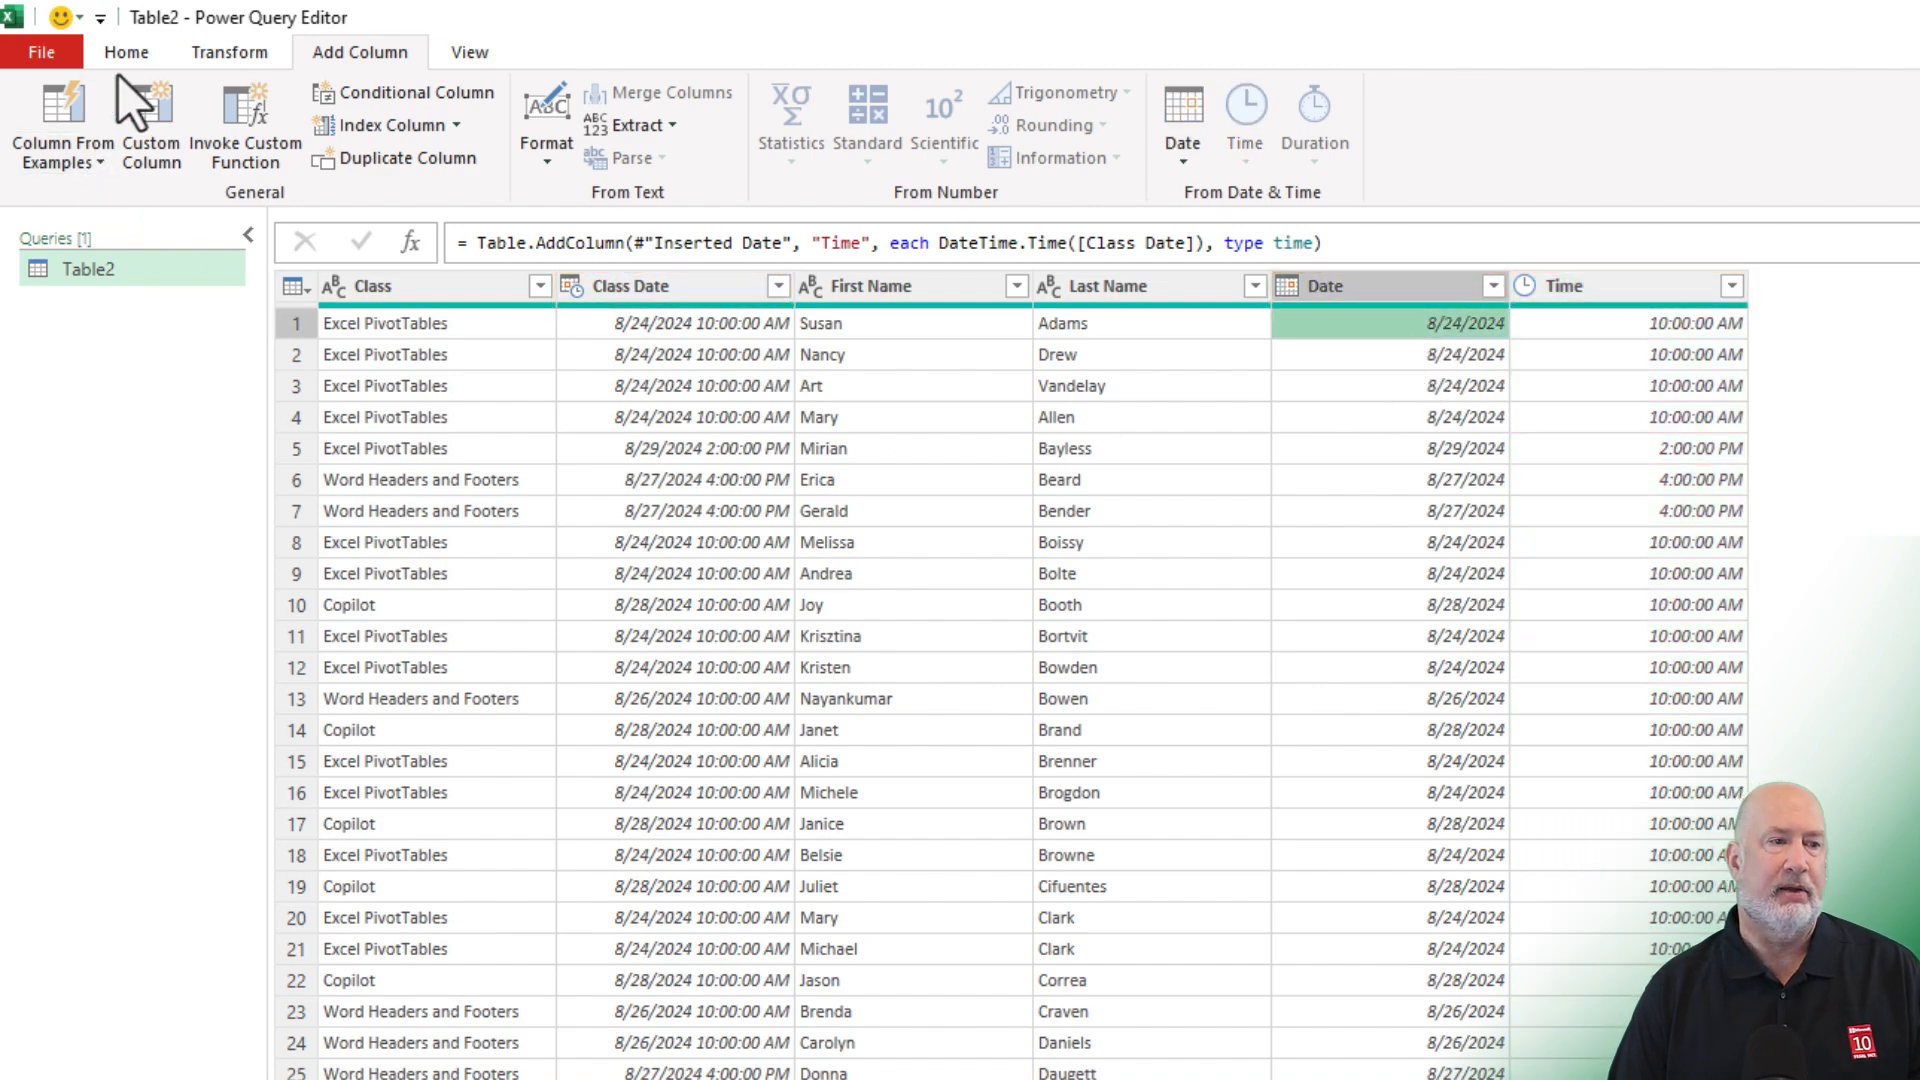
4. Once you have separated the date and time, go to the Home tab and select Close & Load To. Choose to load the data into a new table in Excel.
Refreshing Data with Power Query
One significant advantage of using Power Query is the ability to refresh data easily. If your original data changes, you can quickly update the separated date and time.
1. After adding new records to your original data, go to the Queries and Connections pane in Excel. Right-click on your query and select Refresh.
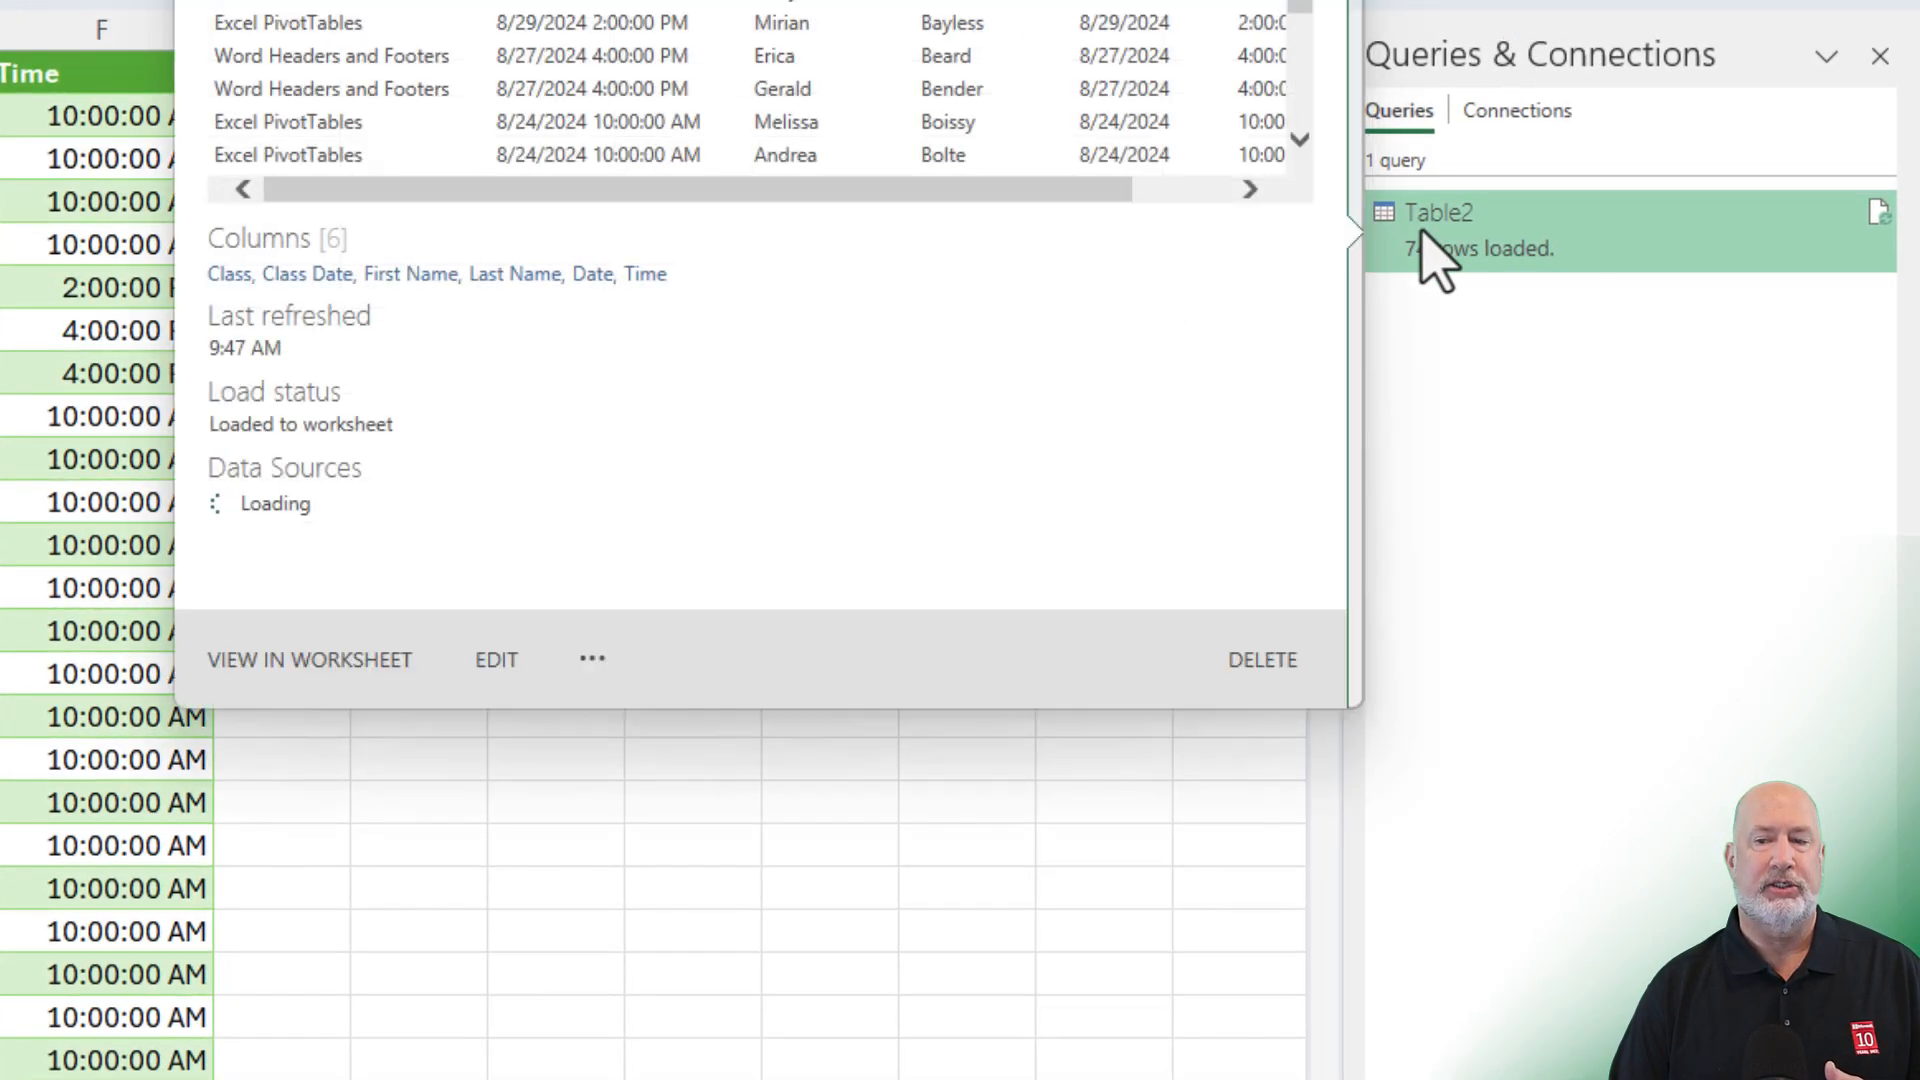
2. The data will update, reflecting any changes made in the original dataset.

Conclusion
Separating date and time in Excel can be efficiently done using the Integer function or Power Query. Both methods have their advantages, with Power Query offering more dynamic capabilities and easier data refreshes.
We hope you found this guide helpful. Feel free to subscribe to our channel for more Excel tips and tricks. Let us know in the comments which method you prefer: Integer function or Power Query.
Thank you for reading!
Recent Articles

Mastering Excel Slicers: A Comprehensive Guide
Excel slicers are powerful tools that enhance data filtering in Microsoft Excel, making it easier to visualize and analyze your data. In this blog, we will explore how to create and effectively use slicers, as well as their advantages and limitations in comparison to traditional filters.

Copilot in Word: Quickly Add Numbers with Ease
Discover how Copilot in Microsoft Word can quickly and accurately add numbers within your documents, saving you time and reducing errors. Learn to streamline your workflow with this intelligent assistant.

Summarize Outlook Attachments with Copilot
In today’s fast-paced digital world, managing emails efficiently is crucial, especially when it comes to handling attachments. I demonstrate an exciting new feature that has rolled out in Microsoft Outlook’s Copilot — the ability to summarize Outlook attachments with Copilot

Chris Menard
Chris Menard is a Microsoft Certified Trainer (MCT) and Microsoft Most Valuable Professional (MVP). Chris works as a Senior Trainer at BakerHostetler - one of the largest law firms in the US. Chris runs a YouTube channel featuring over 900 technology videos that cover various apps, including Excel, Word, PowerPoint, Zoom, Teams, Coilot, and Outlook. To date, the channel has had over 25 million views.
Menard also participates in 2 to 3 public speaking events annually, presenting at the Administrative Professional Conference (APC), the EA Ignite Conference, the University of Georgia, and CPA conferences. You can connect with him on LinkedIn at https://chrismenardtraining.com/linkedin or watch his videos on YouTube at https://chrismenardtraining.com/youtube.
Categories