How to use XLOOKUP function in Excel

The XLOOKUP function is one of my absolute favorites in Excel. It allows you to quickly look up various values in one range and return a corresponding value from another range. Unlike VLOOKUP, XLOOKUP looks both ways, and is more versatile and flexible, particularly when you move ranges around or insert new columns and so on. Let's have a look at how the XLOOKUP function works.
How does XLOOKUP work?
The required syntax for the XLOOKUP function is this:
=XLOOKUP(lookup\_value, lookup\_array, return\_array, \[if\_not\_found\], \[match\_mode\], \[search\_mode\])
1. You first have to specify **what value you are looking for** (lookup\_value) - either by typing the value in the formula or by selecting it on the spreadsheet. 2. Then you have to select **the look up range** (lookup\_range). This is the range you are searching IN for a match of that look up value 3. The third argument of the XLOOKUP function is what **data do you want returned**(return\_range). You select the range where you want the matching result returned from. 4. The 4th argument in XLOOKUP is optional. Where a valid match is not found, return the \[if\_not\_found\] text you supply. If a valid match is not found, and \[if\_not\_found\] is missing, #N/A is returned. 5. The 5th argument is optional. Specify the match type: 0 - Exact match. If none found, return #N/A. This is the default. -1 - Exact match. If none found, return the next smaller item. 1 - Exact match. If none found, return the next larger item. Another great feature of XLOOKUP is the default is exact match. With VLOOKUP you have to specifiy exact match. 6. The 6th argument is optional. Specify the search mode to use: 1 - Perform a search starting at the first item. This is the default.
-1 - Perform a reverse search starting at the last item. 2 - Perform a binary search that relies on lookup\_array being sorted in ascending order. If not sorted, invalid results will be returned. -2 - Perform a binary search that relies on lookup\_array being sorted in descending order. If not sorted, invalid results will be returned.

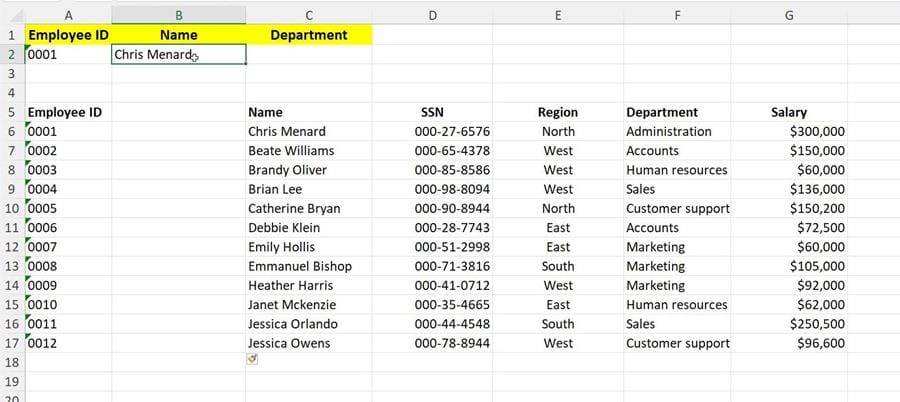
1. In my example above, I have a list of employees and I want to look up the employee with ID 0001 (cell **A2**). I make that the first argument of the XLOOKUP function. 2. Then, I select the look up range (the range I am looking in to find the employees). That's the column with all the IDs, the cells in the **A6:A17** range. That is my second argument. 3. Finally, I specify the third argument - which range holds the value I want returned? In my case, **B6:B17** has the employee names. So I want my XLOOKUP to find the employee by their ID and return their name.
So my formula above would be:
XLOOKUP(A2, A6:A17, B6:B17)
That's very easy.
Why is XLOOKUP so great?
One reason is that, for example if I've defined the XLOOKUP formula and I need to shift cells, insert a new column, for example so that my data moves to the right, notice the formula still holds and the results are the same:

XLOOKUP still works even if you shift columns and insert new cells that your data ranges move around
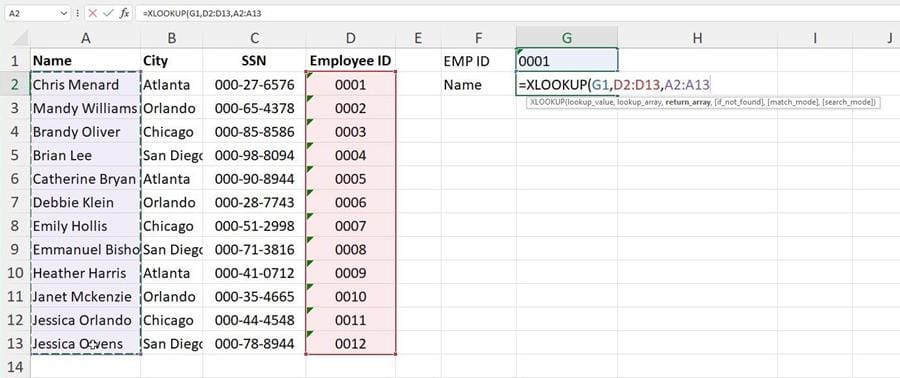
Another reason I like is that, as opposed to the VLOOKUP function which only looks ahead, I can look up to the left or both ways, really, with the XLOOKUP function:

XLOOKUP looks both ways, not just to the right, like VLOOKUP does
I hope you enjoy this very quick XLOOKUP function tutorial for Excel. I have many more coming, I'm planning on covering most Excel functions in a quick, beginner-friendly fashion with one-two minute tutorials. Check out the video for this tutorial on my channel and here's a [playlist with all the one-minute Excel videos]so far.|


