Using Co-Pilot in Excel for Conditional Formatting: A Step-by-Step Guide
Posted on: 04/19/2024

Introduction to Copilot in Excel
Ever wondered how to make Excel work smarter for you? Meet Excel's Copilot, a feature that feels like having an expert sitting right next to you. Copilot in Excel is a game-changer for those of us who spend a lot of time analyzing data. It's like having a personal assistant who's really good at Excel. This feature helps you perform complex tasks, such as conditional formatting, with ease.
Imagine wanting to highlight important data points by using different colors, but the thought of setting this up manually feels daunting. This is where Copilot shines. With just a few instructions from you, Copilot can apply multiple conditional formatting rules all at once. It simplifies the process, saving you time and reducing the chance of errors.
Copilot in Excel - Multiple Conditional Formats
What's impressive about Copilot is its ability to understand and execute commands. You tell it what you need, like changing background colors based on specific criteria, and it does the heavy lifting. After it's done, Copilot even confirms the actions it has taken. This feedback loop ensures that your data looks exactly how you envisioned it. Plus, if you're curious about what Copilot did, you can easily check the formatting rules it applied.
Adopting Copilot in your Excel workflow can dramatically improve how you handle data visualization and analysis, making your spreadsheets not only more functional but also more visually appealing.
Video - Copilot in Excel applying multiple conditional fomats at one time
1. Identify Your Data Range
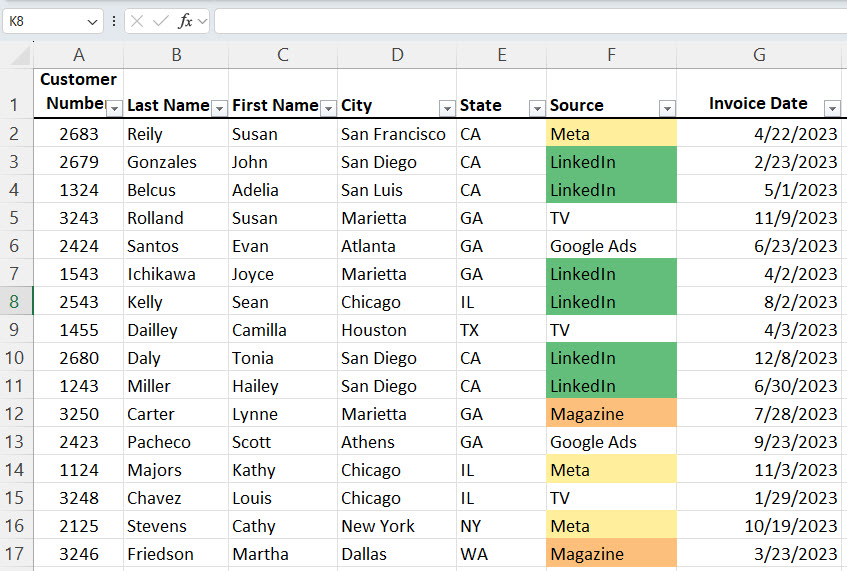
First things first, you need to know which part of your spreadsheet needs the conditional formatting. For me, it was column F. This column contained various sources of data, and I wanted to visually differentiate them with colors.
2. Decide on Your Conditions and Colors
Next, decide on the conditions and the corresponding colors you want to apply. My goal was to highlight data from different sources in different colors. Specifically, I wanted:
- Anything marked as "Meta" to be yellow,
- Anything from "LinkedIn" to be green, and
- Any "Magazine" entries to be orange.
Your conditions will depend on your specific data needs.
Copilot in Excel - Prompt Box - Multiple Conditional Formats
3. Activating Copilot
With your conditions ready, it's time to bring in Copilot. Click into your data and pull up Copilot.
4. Giving Instructions to Copilot
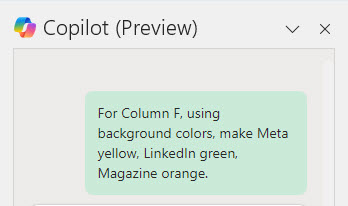
Here's where you get specific. I told Copilot, "For column F, using background colors, make Meta yellow, LinkedIn green, and Magazine orange." The trick is to be clear about your conditions and desired outcomes. Copilot is smart, but it follows your commands, so clarity is key.
5. Let Copilot Do Its Magic
After sending my command, Copilot got to work. In a moment, it applied the conditional formatting rules across column F, exactly as I had instructed. The best part? Copilot confirmed its actions, telling me it was "done" and even showing exactly what it had applied. This feedback is great for peace of mind.
6. Review and Test
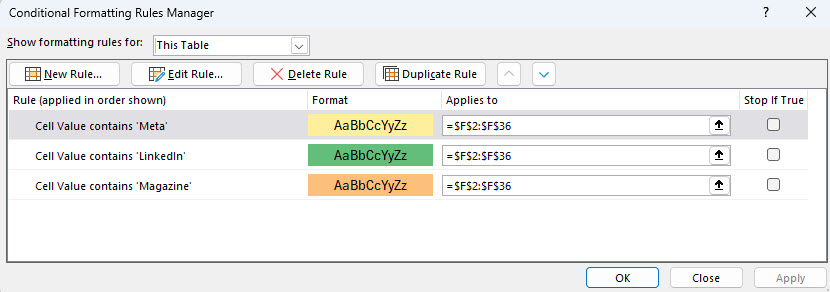
Curious about what Copilot did? You can easily check. Just go to the "Conditional Formatting" option in Excel, and select "Manage Rules". There, you'll see all the rules Copilot set up for you. I tested it by changing a cell's content to "LinkedIn", and it turned green - just as expected!
Conditional Formatting - Manage Rules - Copilot did this!
Two of Chris Menard's Online Training Courses
View all the courses at https://courses.chrismenardtraining.com
Recent Articles

Nov 4, 2025 - Executive Insights: Harnessing Excel for Strategic Analysis
Nov 4, 2025 - Join us on November 4, 2025, for a live, in-person training: Executive Insights – Harnessing Excel for Strategic Analysis. Learn how to master Power Query, PivotTables, data cleaning, sorting and filtering, conditional formatting, and charts to create impactful reports and support leadership with confidence. Perfect for Executive Administrative Professionals looking to boost efficiency and deliver data-driven insights.

Chris Menard
Chris Menard is a Microsoft Certified Trainer (MCT) and Microsoft Most Valuable Professional (MVP). Chris works as a Senior Trainer at BakerHostetler - one of the largest law firms in the US. Chris runs a YouTube channel featuring over 900 technology videos that cover various apps, including Excel, Word, PowerPoint, Zoom, Teams, Coilot, and Outlook. To date, the channel has had over 25 million views.
Menard also participates in 2 to 3 public speaking events annually, presenting at the Administrative Professional Conference (APC), the EA Ignite Conference, the University of Georgia, and CPA conferences. You can connect with him on LinkedIn at https://chrismenardtraining.com/linkedin or watch his videos on YouTube at https://chrismenardtraining.com/youtube.
Categories
This post is not assigned to any category