OneDrive Request Files: How to Use OneDrive to Collect Files Securely
OneDrive Request Files feature allows you to collect files from people inside or outside your organization, without letting those people see anyone else’s uploads.

I created a short tutorial demonstrating the OneDrive Request Files feature, which allows you to collect files from people inside or outside your organization — without letting those people see anyone else’s uploads. If you want a quick way to gather Word documents, Excel files, headshots, bios, forms, or any set of files from multiple contributors, the OneDrive Request Files flow is one of the easiest and most privacy-friendly options available.
Note: Your company may not allow you to use OneDrive for external sharing.
OneDrive: How to Request Files from Others - YouTube
Why use OneDrive Request Files?
The biggest benefit of the OneDrive Request Files feature is privacy and simplicity. When I request files using this method, contributors can upload directly into a folder I control, but they never see the submissions from other people. That solves a couple of practical problems:
- It prevents accidental disclosure of other people’s data (especially important for external contributors).
- It simplifies the collection process — contributors don’t need to sign in or manage folder permissions.
- Uploads are organized in the target folder with the submitter’s name prefixed to each file so I can sort and track submissions quickly.
What I set up (overview)
Here’s the simple flow I follow every time I use the OneDrive Request Files feature:
- Create a dedicated folder in OneDrive for the request.
- Use the folder’s "Request files" option to generate a secure upload link and provide an optional message.
- Send the link to contributors (internal or external).
- Contributors upload files without seeing others’ uploads.
- I review and organize submitted files in the target folder — file names include the submitter’s name.
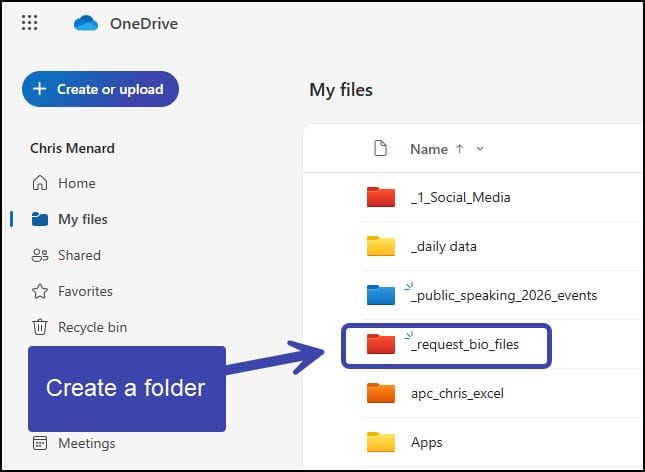
Step-by-step: Create the folder
I start in OneDrive for work (the feature is part of OneDrive for work/business). From the OneDrive web interface, I create a new folder and give it a meaningful name — for example, "Requesting speaker information" or "Speaker bios and headshots." You can also add a folder color if you use colors to visually organize tasks.

Tip: choose a clear folder name that tells people what they’re uploading and what format you expect (e.g., "Headshots and Bios - JPEG/PDF/Word"). That may reduce follow-up questions.
Step-by-step: Generate the request link
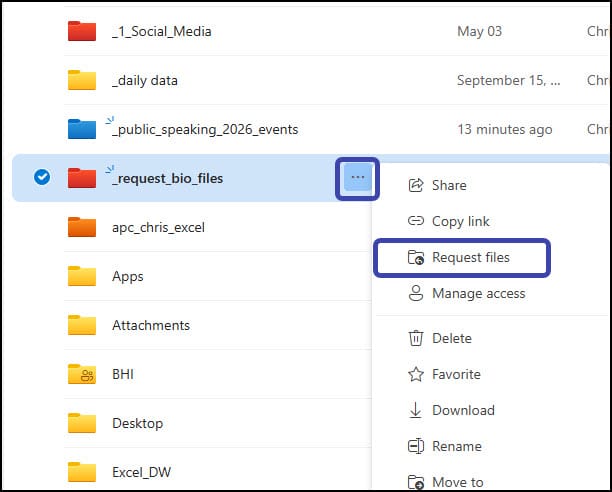
With the folder created, I open the folder menu. You may not see the request option if you click directly into the folder name; instead, click the three dots (More actions) beside the folder and choose "Request files." That launches a small wizard where you describe what you’re asking for and generate the shareable upload link.
I usually type a short message explaining the purpose — for example: "I need your headshot and short bio to add to our event webpage." Then I click Next and copy the generated link. You can also type email addresses into the dialog if you prefer OneDrive to send the message directly, but I often copy the link and paste it into my own email for more control.
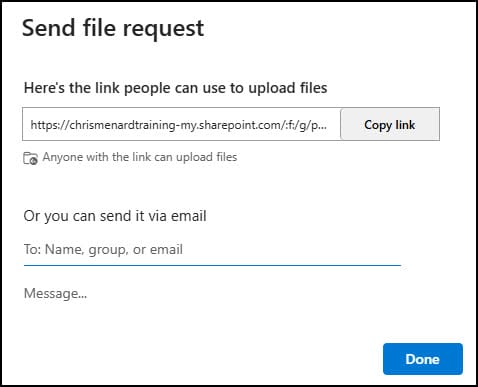
Note: the UI will indicate that the request is active once the link is created and copied. That means the folder is now accepting uploads via the link.
What the recipient sees and does
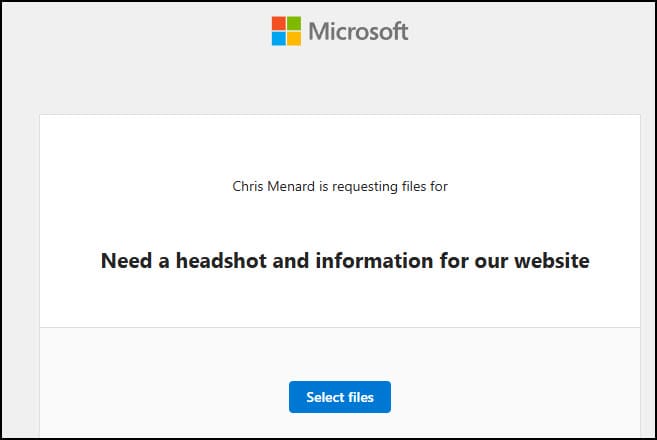
To show contributors exactly what to expect, I always test the link in a private browser window. Recipients don’t have to sign in; they’ll see a simple upload page with your name and the message you provided. The page has a Select Files button and fields to add their name so the system can prefix the uploaded files with the submitter’s name.
The upload experience is straightforward: they choose files, optionally add their name, and click Upload. They can come back later and upload more files with the same link if you allow multiple uploads. I’ve had contributors upload PowerPoint decks, Excel spreadsheets, PDFs, and images without issue — all handled by the same link.

How submissions appear in your folder
After someone uploads files, I return to my OneDrive folder to review the submissions. OneDrive automatically prefixes each uploaded file name with the submitter’s name (for example, "Susan Davis - Headshot.jpg"), which makes it easy to sort and filter. Since the contributor can’t view the folder contents, they never see what other people have uploaded — which is perfect for maintaining privacy.

I appreciate that OneDrive does this renaming for me. I can sort by name, then separate the person’s files into a subfolder or rename them to match my site’s conventions. This saves me a lot of manual renaming and the mistakes that often come from downloading everything and trying to match filenames later.
Testing notes and limitations
There are a couple of important caveats and best practices I recommend:
- The OneDrive Request Files feature is available in **OneDrive for Work** (business/enterprise) — I don’t believe it’s available for personal or family OneDrive accounts. If you use a personal account, check your tenant or Microsoft 365 plan to confirm availability.
- Guests upload without seeing other submissions, but they should follow the name and file-type instructions you provide. Be specific about acceptable formats and maximum file size if you need to avoid large uploads.
- If you need contributors to edit or collaborate on a single file, Request Files is not the right tool — it’s for collecting separate files. For collaborative documents, use file sharing with edit permissions, SharePoint, or a Teams Channel (which is SharePoint).
In my experience, the workflow works reliably for internal and external contributors. I test links in private windows to confirm the experience, and I include clear instructions in the email to reduce user confusion.
Practical examples of using OneDrive Request Files
Here are a few examples on when to use the OneDrive Request Files method:
- Collecting speaker bios and headshots for event websites.
- Gathering expense receipts from contractors when multiple people submit documents.
- Requesting signed PDF forms from clients without exposing other clients' files.
- Collecting marketing assets (logos, product photos) from external agencies.
- Forms from employees.
Whatever the scenario, the privacy guarantee — each contributor only sees their own uploads — makes this approach ideal when handling multiple external contributors.
My recommended checklist before sending a request link
- Create and name the folder clearly (include purpose and date if needed).
- Add an explanatory message when creating the request (formats, size limits, deadline).
- Test the link yourself in a private browser to confirm the upload flow.
- Decide whether to let OneDrive send the email or paste the link into a custom email with detailed instructions.
- Monitor uploads and rename or reorganize files as they arrive.
Frequently Asked Questions (FAQ)
Q: Is OneDrive Request Files available for personal OneDrive accounts?
A: As of my testing, OneDrive Request Files is a feature for OneDrive for work/business accounts.
Q: Can external users see other people’s uploads?
A: No. That’s the key advantage: contributors only see their own submissions. They cannot browse the folder or view files uploaded by others.
Q: Do contributors need a Microsoft account to upload?
A: No. External contributors can upload files using the request link without signing into a Microsoft account. They do need to provide a name if you require it, so the files can be labeled properly.
Q: Can I limit the types or sizes of files uploaded?
A: OneDrive enforces general file size limits based on your tenant and plan. If you need stricter restrictions (e.g., only images under a certain size), include that requirement in your request message and enforce it manually when you review uploads.
Q: What happens after someone uploads files?
A: Files land directly in the target folder in your OneDrive. Each file name is prefixed with the submitter’s name, making sorting and processing straightforward.