Extract Emails from Outlook to Excel using Power Query

Using Power Query in Excel to Manage Email Addresses
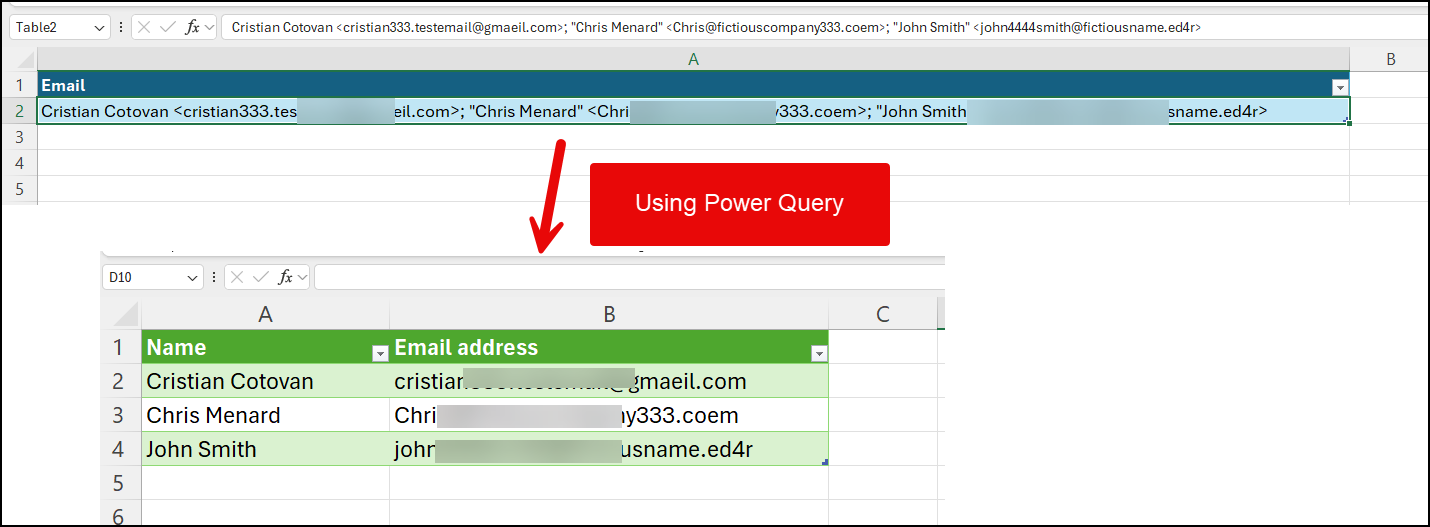
If you have emails in Outlook and need to extract the email addresses, it can be daunting, especially when dealing with many emails. In this blog, we will explore how to use Power Query to efficiently break down email addresses from Outlook and organize them into separate rows in Excel. One column for the names and one column for the email addresses. Follow along as we dive into the step-by-step process.

**Outlook Emails to Excel in a tabular format**
Setting Up the Data
To begin, open Excel and create a new worksheet. Then, navigate to Outlook and select an email containing the email addresses you wish to work with. Copy the email addresses by pressing CTRL-A to select all and CTRL-C to copy. Now, switch back to Excel and paste the email addresses into cell A2.
YouTube Video - Email from Outlook to Excel with Power Query
Creating a Table with Power Query
To utilize Power Query, you first need to convert your data into a table. If you are new to Power Query, fear not, as the process is straightforward. Simply go to the **Data** tab, select " **From Table/Range**," and click on " **Create Table**." Power Query will launch automatically, displaying your data in a structured format.
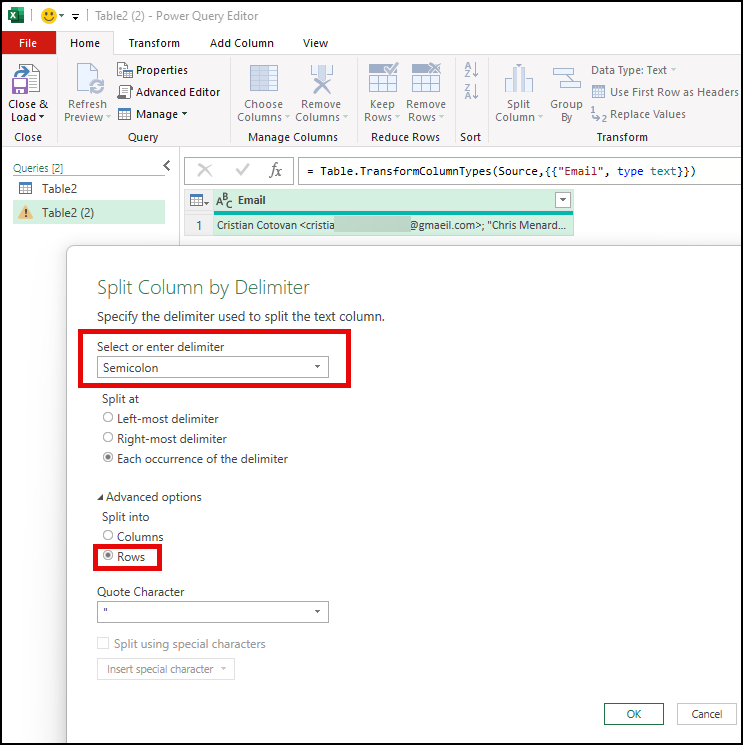
At this stage, you may notice that all the email addresses are currently in a single row. This is where Power Query's split column feature comes into play. By selecting the email column and choosing 'split column by delimiter,' you can split the addresses into separate rows based on a specified delimiter, such as a semicolon.

**Outlook emails in Excel**
Organizing Email Addresses
After splitting the email addresses into separate rows, you may encounter additional formatting issues, such as extra symbols or spaces. By utilizing Power Query's advanced options, you can customize the splitting process to suit your data's unique characteristics. Remember to pay attention to details like special characters and spaces that may affect the formatting.
Another useful feature of Power Query is the ability to rename columns and clean up data by removing unnecessary spaces. By using functions like trim and replace values, you can ensure that your email addresses are accurately formatted and ready for further analysis.

**Power Query - Split columns**
Finalizing the Data
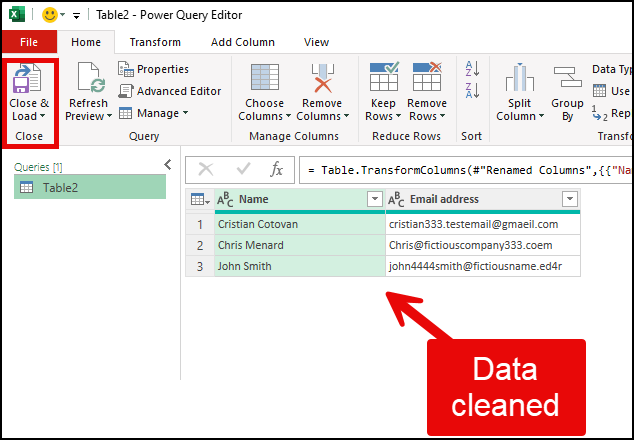
Once you have organized and cleaned up your email addresses, it's time to load the data back into Excel. By clicking on 'Close and Load,' you will generate a new worksheet with the formatted email addresses neatly arranged for easy access and management.
Furthermore, Power Query allows for dynamic updates, meaning that any changes made to the original data in Outlook will automatically reflect in your Excel worksheet. This feature streamlines the process of managing email contacts and ensures that your data remains up-to-date.

**Power Query - Outlook emails**
Conclusion
In conclusion, using Power Query in Excel is a powerful tool for efficiently managing and organizing email addresses from Outlook. By following the steps outlined in this blog, you can streamline the process of breaking down email addresses into separate rows and ensuring their accuracy and consistency. Enhance your data management skills with Power Query and simplify the task of working with email contacts in Excel.
If you found this blog helpful, consider exploring additional training resources, such as Excel online courses or Microsoft Teams tutorials. Your support is greatly appreciated, so don't forget to like and subscribe to stay updated on future content. Thank you for reading, and have a productive day!


