Claude in Excel: Cross-Sheet XLOOKUP and Building a Data-Validated HR Spreadsheet from Scratch
Two real tests of the Claude add-in for Excel: a cross-sheet XLOOKUP profit calculation, and building an HR spreadsheet from scratch with data validation dropdowns, hidden source lists, and dynamic tables.


The Claude add-in for Excel can act like a co-worker who actually knows Excel — not just a chatbot pasted next to your spreadsheet. To see how far that goes, I ran two real tests: a cross-sheet XLOOKUP on a profit calculation, and building an HR spreadsheet from scratch complete with data validation dropdowns backed by hidden lists. Both passed.
Here's what I learned:
What you need before you start
You need a paid Claude subscription for the add-in to do real work — the free tier won't cut it. Once you're subscribed:
- In Excel, click Add-ins on the Home tab.
- Search for Claude and add it to your file.
- Open the Claude pane from the ribbon. Start a new chat. The prompt box sits at the bottom.
You'll also see a model picker. I used Opus 7 for both tests below — and yes, requests use your Claude credits, so be deliberate about which model you pick.
Test 1: Cross-sheet XLOOKUP for profit
This is the kind of formula that trips a lot of people up — pulling values from a separate worksheet to do a calculation. I wanted to see whether Claude would recognize the second sheet on its own and build the right XLOOKUP without me spelling out the syntax.
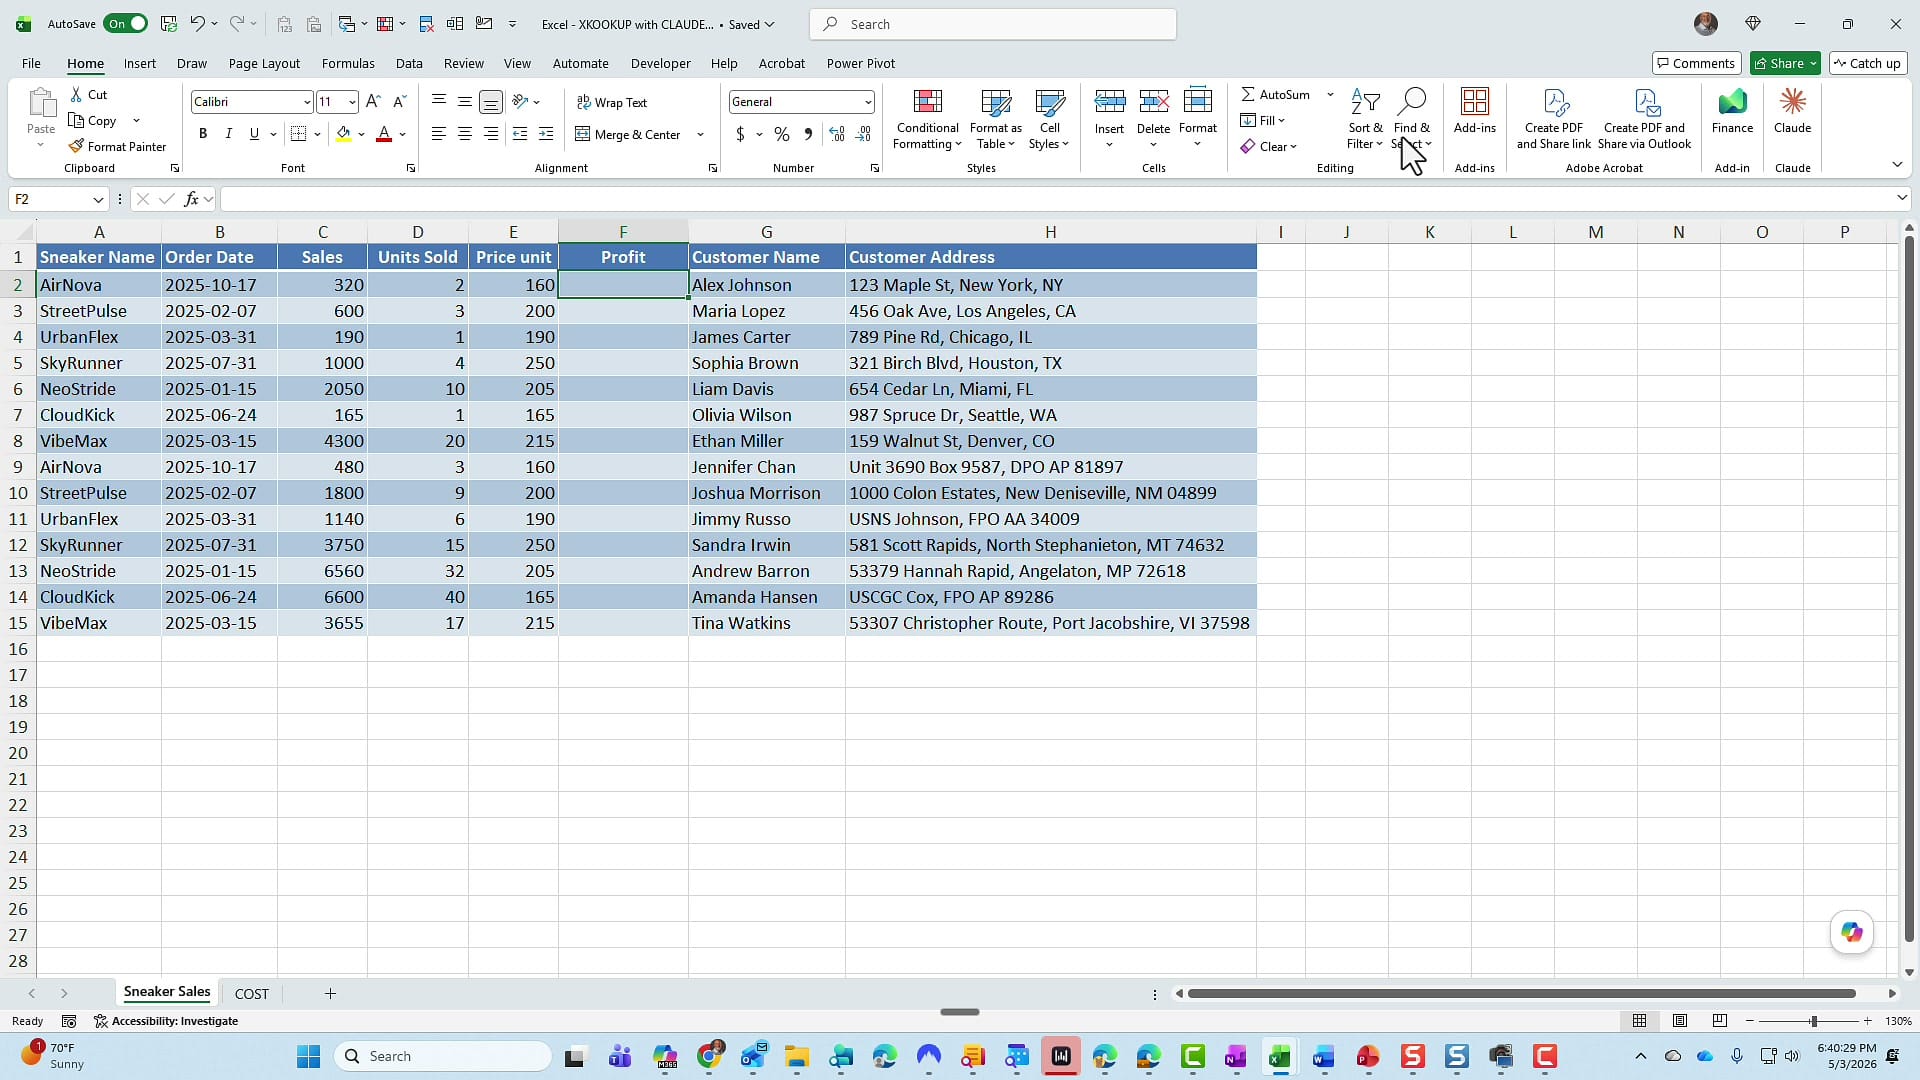
The math is simple. Air Nova in row 2: 2 pairs at $160 = $320 in sales. Cost is $100 per pair, so 2 × $100 = $200. Profit should be $120. The catch is that cost data isn't on the sales sheet — it's on a sheet named Cost.
Here's the exact prompt I gave Claude:
On this current Excel worksheet, I'm trying to figure out the profit, which is column F. The issue is the cost is located on a completely different worksheet called Cost. Go figure out the profit for me.
That's it. No mention of XLOOKUP. No instructions about table references or sheet syntax. Claude finished in seconds.
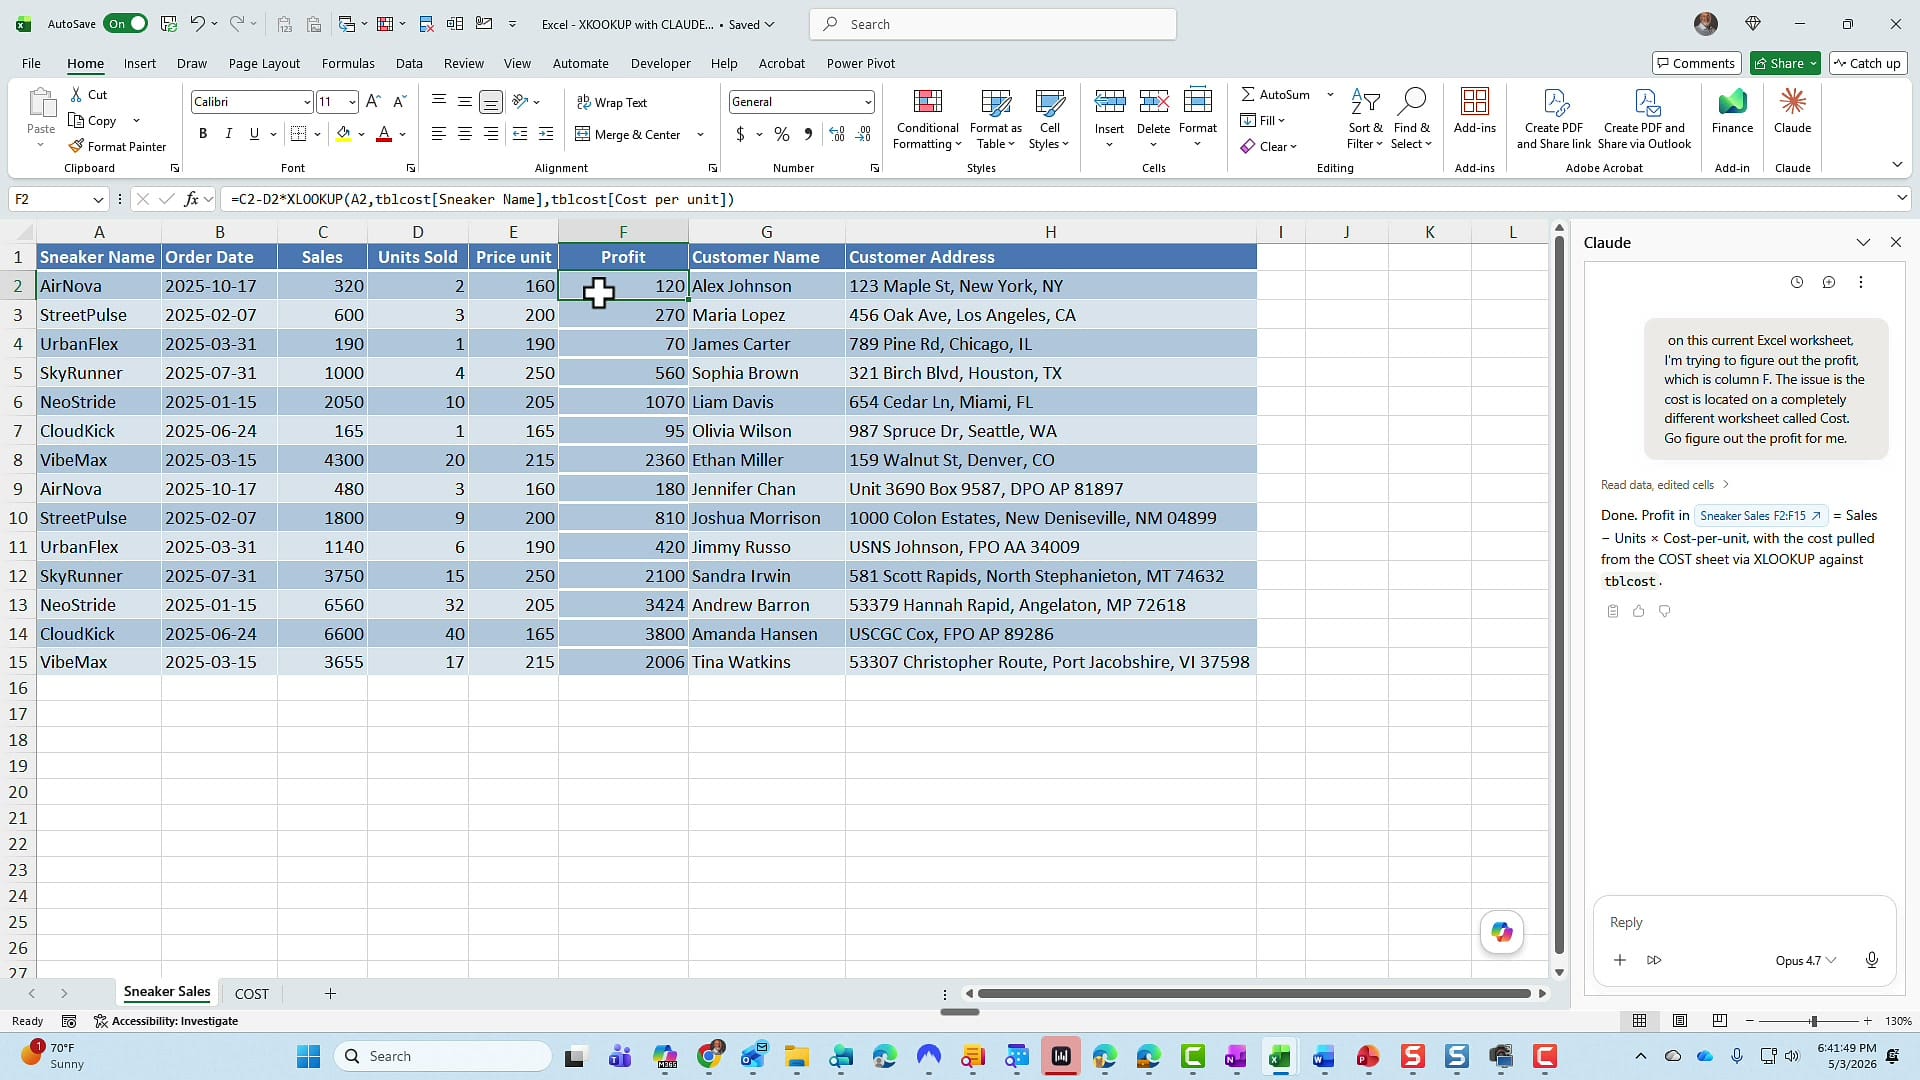
Spot-check another row to confirm: StreetPulse sold 3 pairs for $600 in sales. Cost is $110 per pair, so 3 × $110 = $330. Profit should be $600 − $330 = $270. The sheet shows $270. Pass.
The formula it wrote uses an XLOOKUP keyed on Sneaker Name against the Cost sheet's table. If you've never written one of these, my walkthrough on how to use the XLOOKUP function in Excel covers the syntax and arguments step by step. And if you're curious how Microsoft's own AI handles a similar challenge, see how Excel Copilot writes complex XLOOKUP formulas automatically — interesting comparison between the two tools on the same kind of problem.
Test 2: Build an HR spreadsheet from scratch with data validation
For the second test I started from a completely blank workbook. The goal: have Claude build an HR-style employee tracker, populate it with sample data, and wire up data validation dropdowns for the trickier fields — all from natural-language prompts.
Step 1: Generate the table structure
I gave Claude this prompt:
Create a new worksheet for me for HR data. I'm trying to track employees. The fields I want to track are employee ID, last name, first name, city, state. I would like to know what department they are assigned to or work in. Also want to know who their manager is and starting salary. Also put in a job title field.
I didn't ask for sample data yet. Claude built an empty Employees table with exactly the columns I described, formatted Starting Salary as currency, and froze the header row. No extras, no missed fields.
Step 2: Generate 150 rows of sample data
Next prompt: "Give me 150 rows of sample data."
I deliberately kept it vague — no list of approved departments, no required job titles. About 30 seconds later, Claude returned a fully populated table.
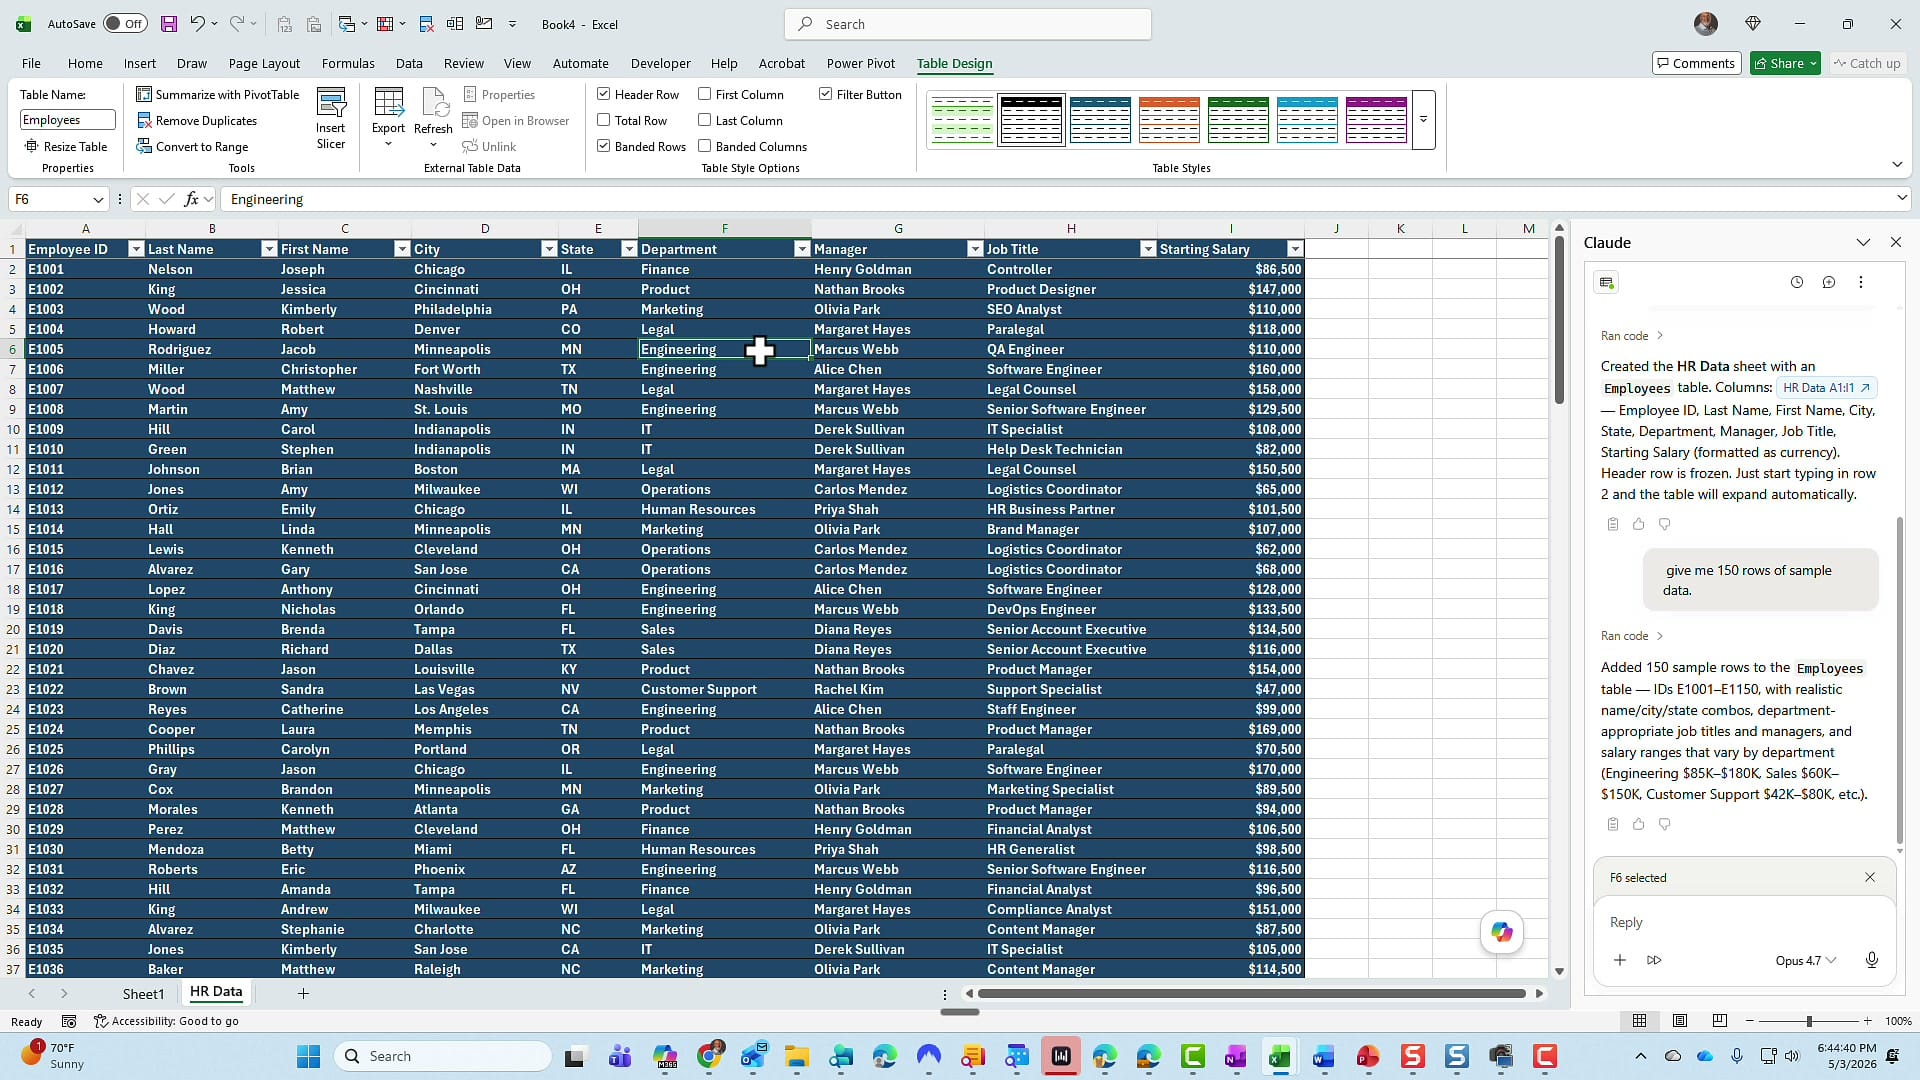
If you want tighter control, you absolutely can be more specific in the prompt — pre-define a department list, set a salary range, restrict job titles. I left it open because I wanted to see Claude's defaults. They were reasonable.
Step 3: Add data validation dropdowns
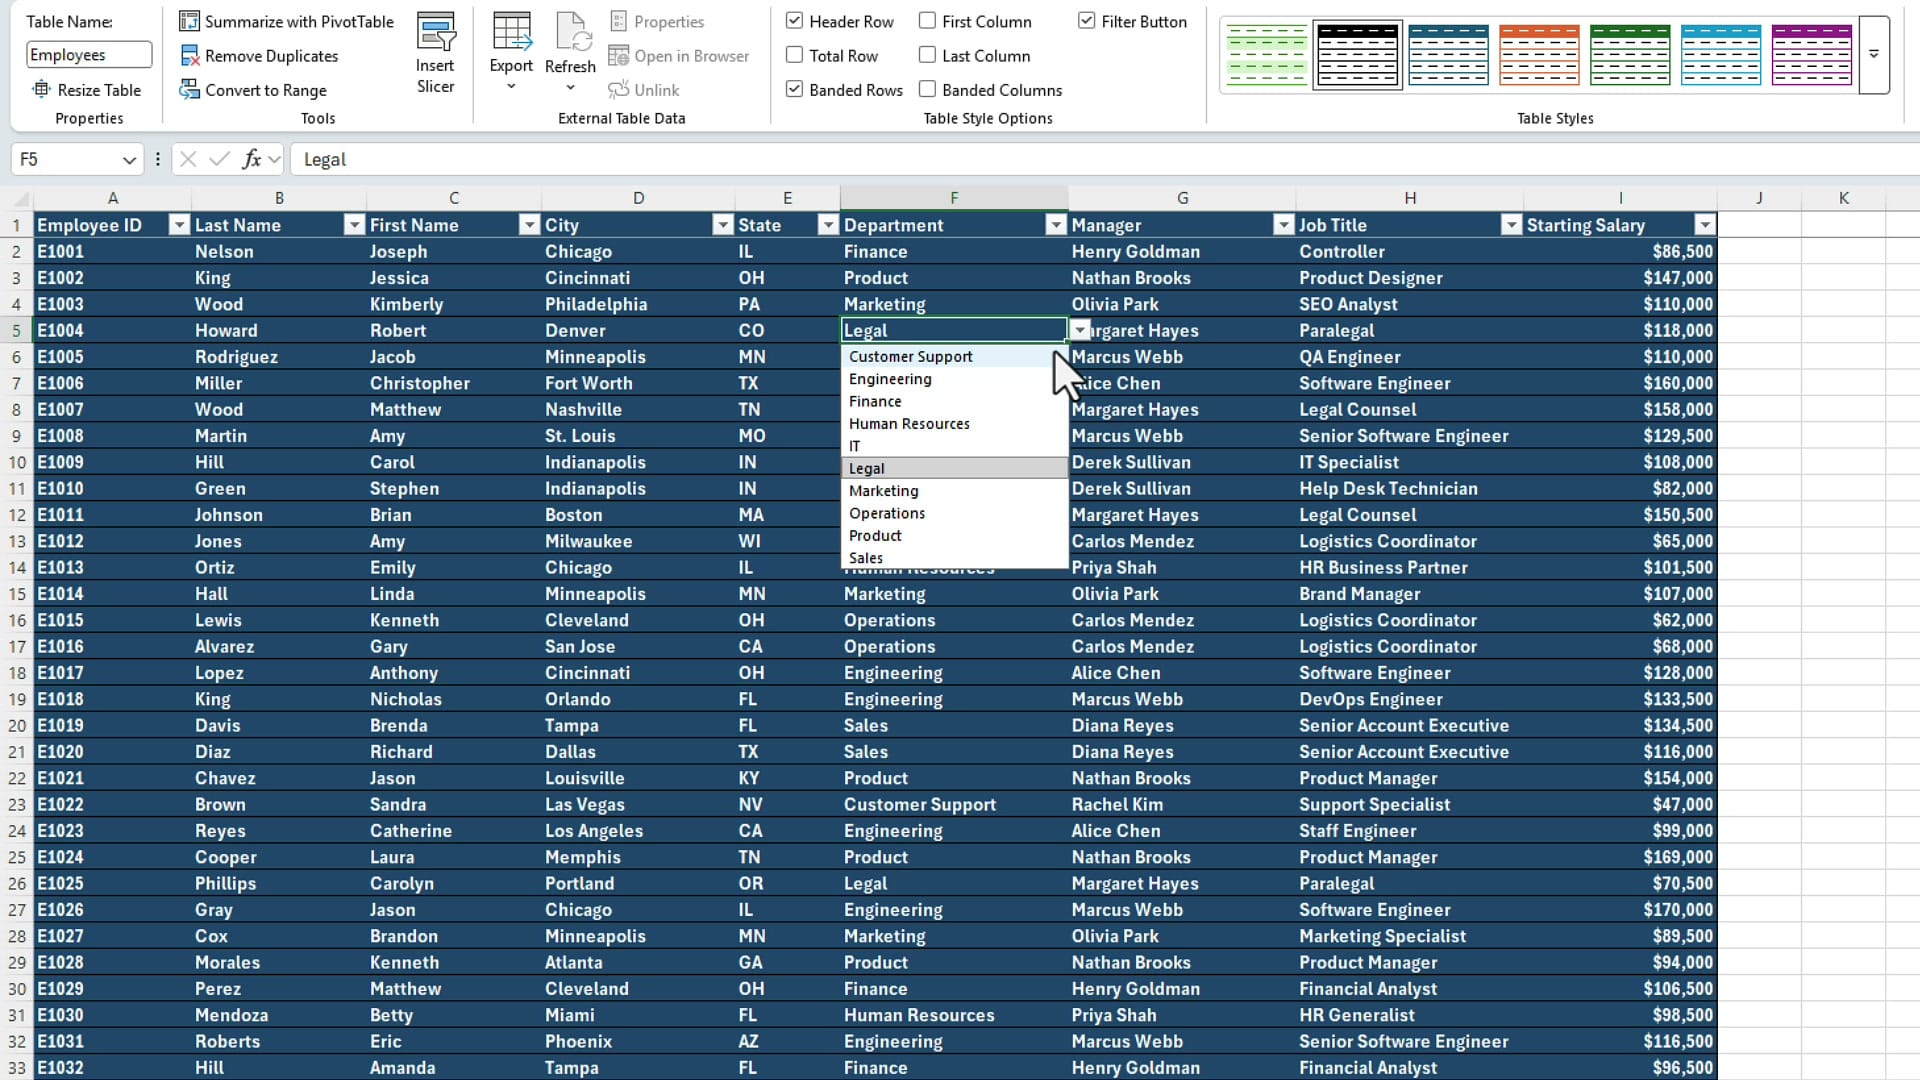
Now the harder ask. Real HR data shouldn't have someone typing "HR" in one row and "Human Resources" in another. Data validation lists are the standard fix — but I wanted Claude to set them up automatically.
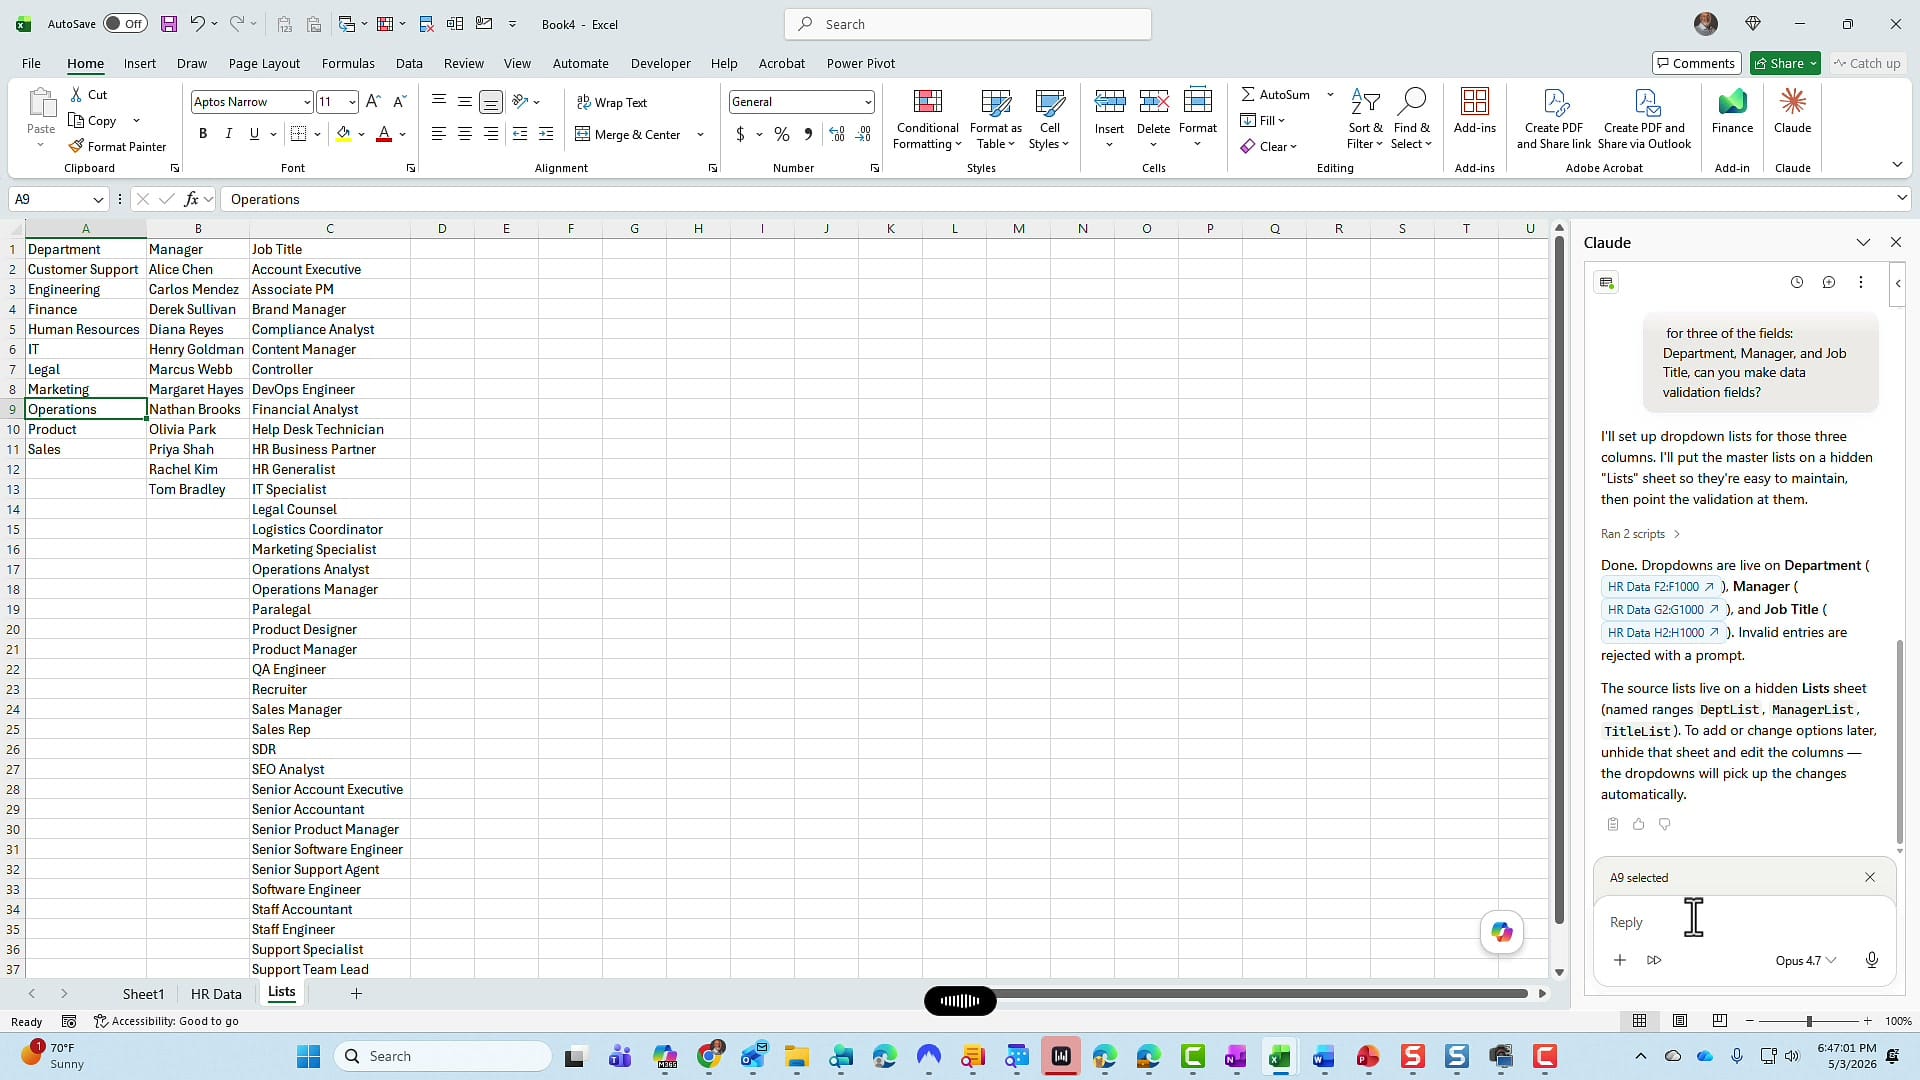
My prompt:
For three of the fields — department, manager, and job title — can you make data validation fields?
Claude announced what it was going to do (build dropdown lists for those three columns, store the master lists on a separate sheet) and asked permission to run the script. I clicked Allow Once.
Three things to call out:
- The Department and Job Title dropdowns came back alphabetized — a nice touch I didn't ask for.
- Invalid entries are now rejected with a prompt, exactly as Excel's built-in validation behaves.
- The source lists are tucked away on a hidden worksheet called Lists. Out of sight, out of the way.
Step 4: Unhide and review the Lists sheet
To see what Claude built, right-click any sheet tab → Unhide → pick Lists. Three columns appeared: Department, Manager, Job Title.
Step 5: Convert the lists into tables
Plain validation lists are fine, but if you ever add a new department or manager, you have to remember to extend the named range. Excel tables fix that — they auto-expand, and any data validation pointing at a table picks up new rows automatically.
I asked Claude to convert the three columns into proper tables, and to leave a blank column between them so they wouldn't merge:
I unhid the Lists worksheet. I appreciate the data validation list. I would like for department, manager, and job title — those data validation lists to actually be tables. I don't care if you put a blank column in between them.
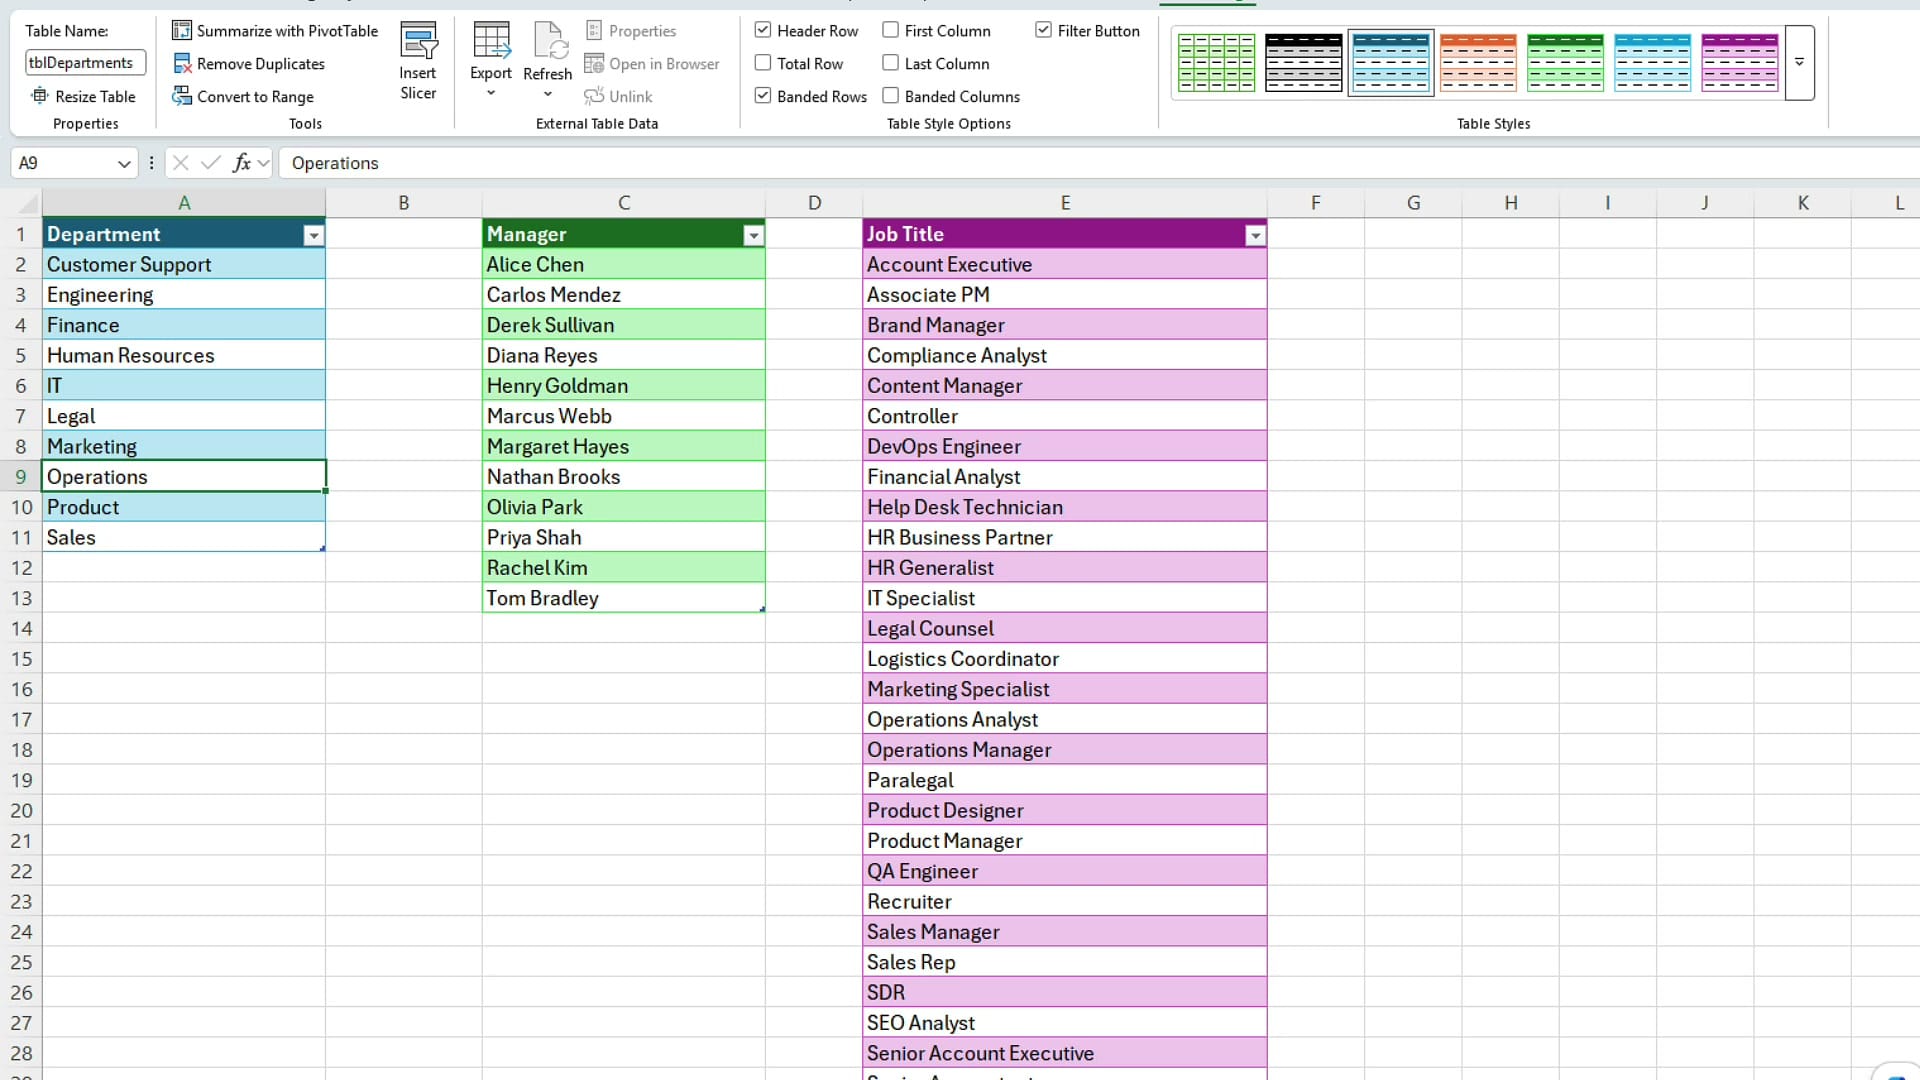
Look at the table names on the Table Design tab: tblDepartments, tblManagers, tblJobTitles. That's exactly the convention I'd use — a "tbl" prefix that makes named ranges easier to spot in formulas.
Step 6: Test that dropdowns update dynamically
To verify the tables actually feed back into the HR Data dropdowns, I added a new value to the Departments table — Training. Then I jumped back to HR Data, opened the Department dropdown, and there it was. New rows in the source table flow straight into validation. That's the whole reason to use tables instead of fixed ranges.
Step 7: Hide the Lists sheet again
Final prompt — partly to keep the workbook clean, partly to test whether Claude could close the loop:
Any chance you can go back and hide the List worksheet for me?
Done. The sheet tab disappears. If you ever need to bring it back, right-click any sheet tab → Unhide → select Lists.
Verdict
Both tests passed. The cross-sheet XLOOKUP especially impressed me — Claude correctly identified that the cost data lived on a separate worksheet, named the right table reference, and built a working formula without me prompting for XLOOKUP at all. The HR build-from-scratch test was equally clean: schema design, 150 rows of sample data, dropdowns, hidden source lists, conversion to tables, and a final hide — all from natural-language prompts.
For day-to-day Excel work — formulas you'd otherwise google, schemas you'd otherwise design slowly, validation lists you'd otherwise build by hand — having Claude inside Excel saves a real amount of time. Just remember: paid subscription required, requests cost credits, and you still want to spot-check the formulas it produces.
If you want to go deeper on the building blocks I touched on here, see my guides on creating a data validation dropdown list in Excel and speeding up data entry and accuracy with data validation lists.
Let me know in the YouTube comments what you'd like Claude to try in Excel next.
Related guides