Import CSV into Google Calendar: 7 Troubleshooting Tips

**I've covered how to [import a CSV file into your Google Calendar](https://chrismenardtraining.com/post/how-to-import-excel-events-csv-into-google-calendar-tips-supported-fields-how-to) in detail before, but as students have gone back to university, I'm getting a lot of questions and emails saying that their import to Google Calendar isn't working. So I've thought I would cover a few troubleshooting tips to make sure your CSV file is formatted correctly and help your import succeed.**
Tip 1: Make sure required fields are filled in
There are two required fields in that header row. One is the header row, it has **Subject** and **Start Date.** you must have something in there so you can't leave the Subject blank. In real life though, you usually fill in most of these fields, I really see it with just two fields filled in. So troubleshooting tip number one is **make sure Subject is filled in**.
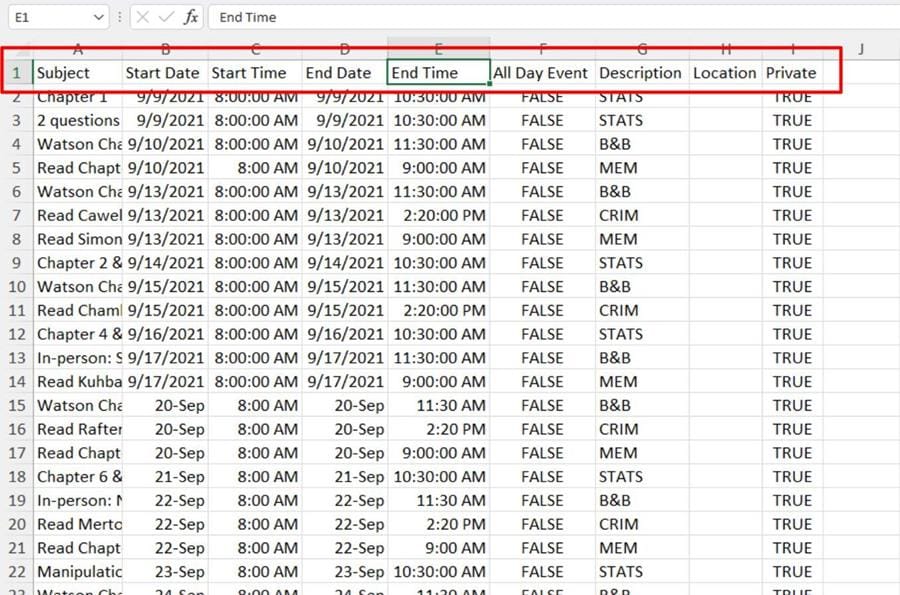
Make sure required fields are filled in the CSV file
Tip 2: Correct date formatting
This is probably the biggest one I see. That Start Date, and the End Date, they have got to be set up, if you noticed here, these dates are correct, when I select them in Excel, they say _Date_, which is actually _Short Date_.
When the dates are not formatted correctly, I get down to these dates, and even though they're correct in the formula bar, in the number group, they say _Custom_. So that is going to be an issue.
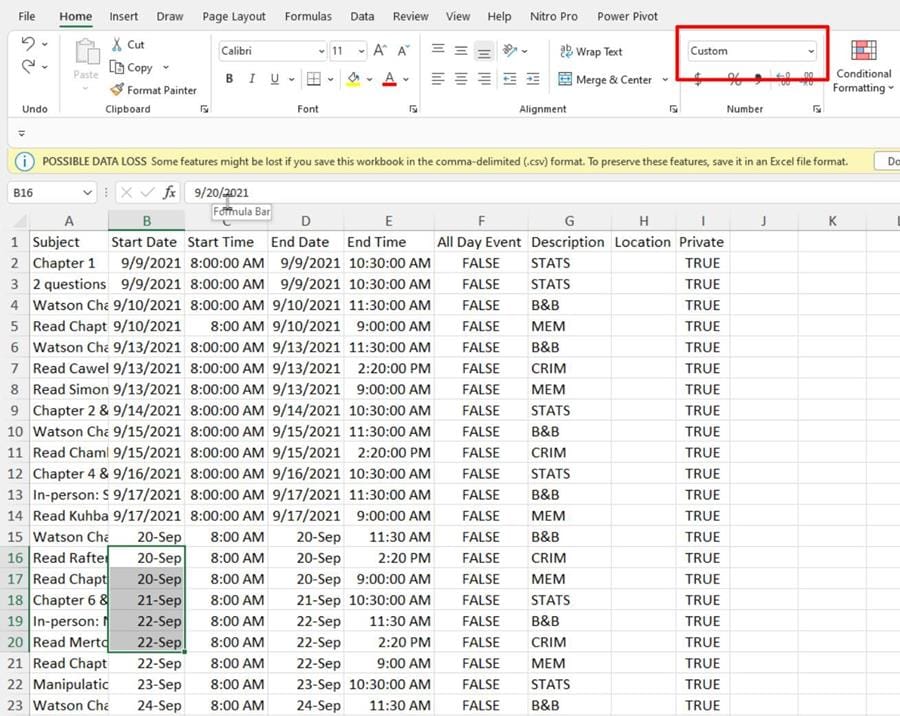
Dates must be correctly formatted as _Short Date_ (M/D/Y)
To properly format them, highlight the dates in your range and tell Excel to force these to _Short Date_. The format must be M/D/Y. That is what you want. To do the exact same thing with the End Date, that is going to be _Short Date_ as well. So that is troubleshooting tip number two: **Make sure your Start Date and End Date are Short Dates.**
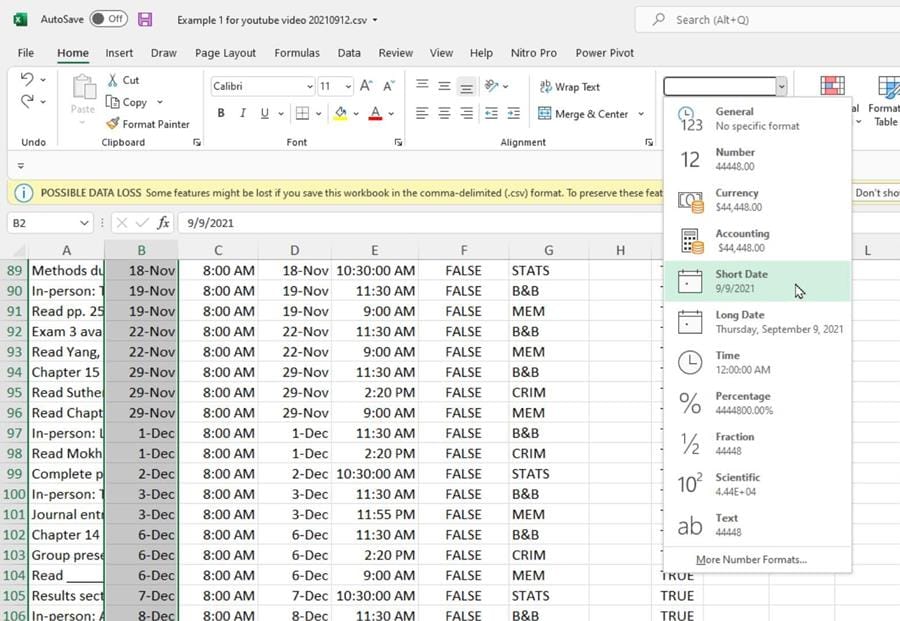
Format dates as Short Date in the CSV file
Tip 3: Correct time formatting
Troubleshooting tip number three, your times. Make sure your columns for time are formatted correctly as _Time_. Again, they may look correct but when you select them, some may be _Custom_. **Make sure time fields are in fact, _Time_.**
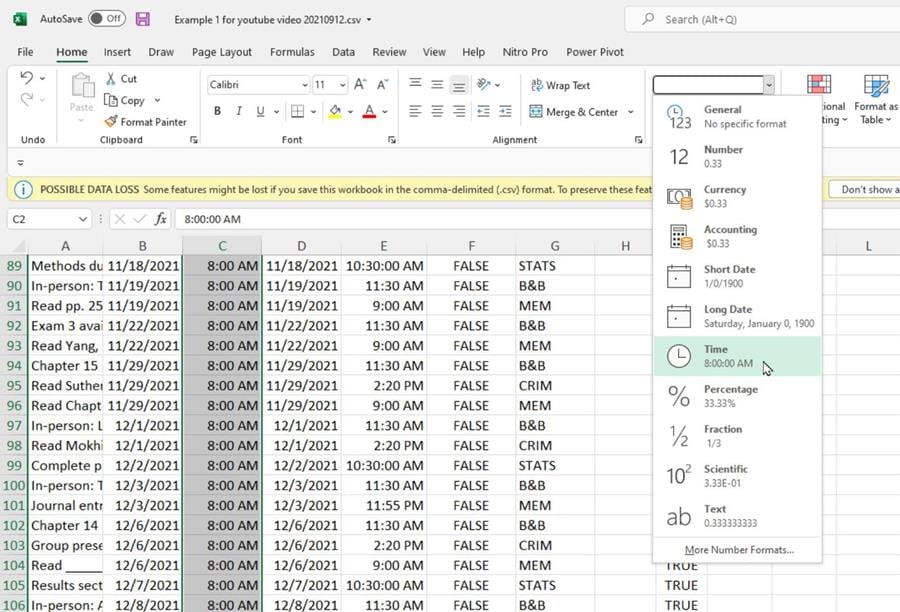
Time must be correctly formatted
Tip 4: All-day events should have no times
If you have events you're trying to import and they are all-day events, you have this column _All day event_. Normally, your events have times and this field is set to FALSE, which is correct. I have seen this set as an all-day event set to true. **If All Day Event is true, there should be no _Start_ and _End_ time in those rows.**
Your description is a text field, you can use it, whatever you want to. Private means it's only for you, this is either true or false. And you can use the Location field, which is also a text field.
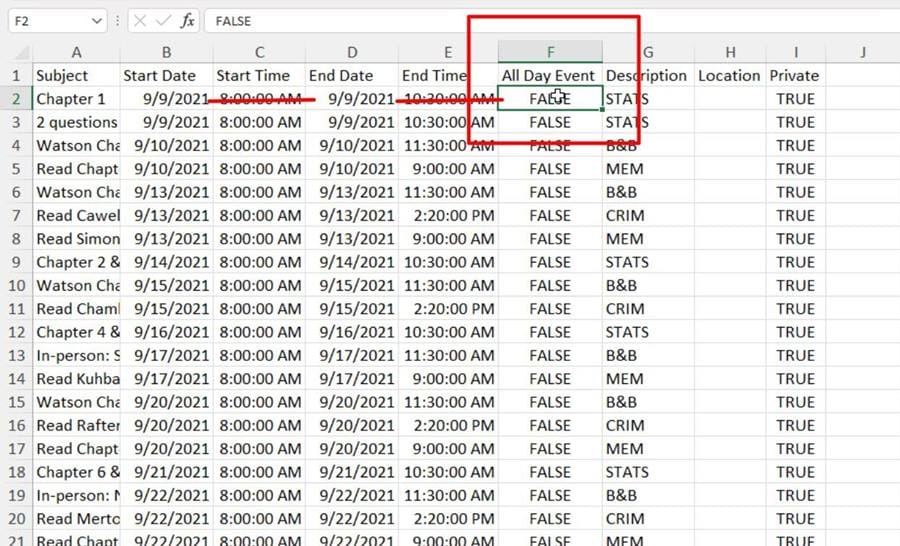
Don't specify start and end time for All Day Events
Tip 5: Start and End Dates should be chronological
One more tip I've got for you is, I have seen one student sent me their file and it pulled in approximately 120 of 160 events. They were wondering why the other 40 didn't come in. So I ran a quick formula because the dates looked a little weird, even though they were formatted correctly. If you get any date difference less than zero between Stard and End date, that's not going to work because it has to be zero or greater. Because the end date's got to be at least the Start Date or in the future. So make sure if you see any negatives, you go fix that.
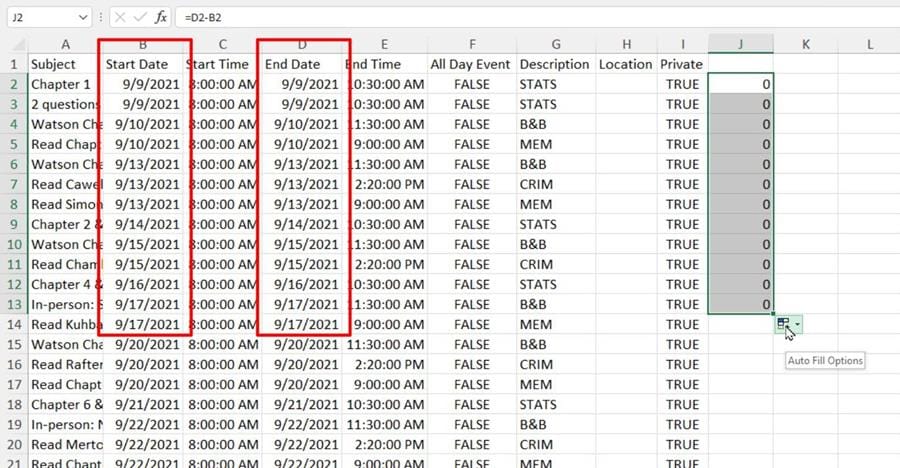
Start and End Dates must be equal or chronological
Tip 6: No blank rows in data
Make sure there's no blank rows in your data. That will cause your import to fail or miss those events after the blank rows.
So to quickly fix this and remove the blank rows:
1. Go to the end of the data 2. Click on the last one 3. Press _Control + Shift + Home_ key to highlight them all 4. Just go do a sort, I don't even care what you sort by, indicate whether your data has headers, sort by subject for example 5. Click OK to get rid of the blanks real quick
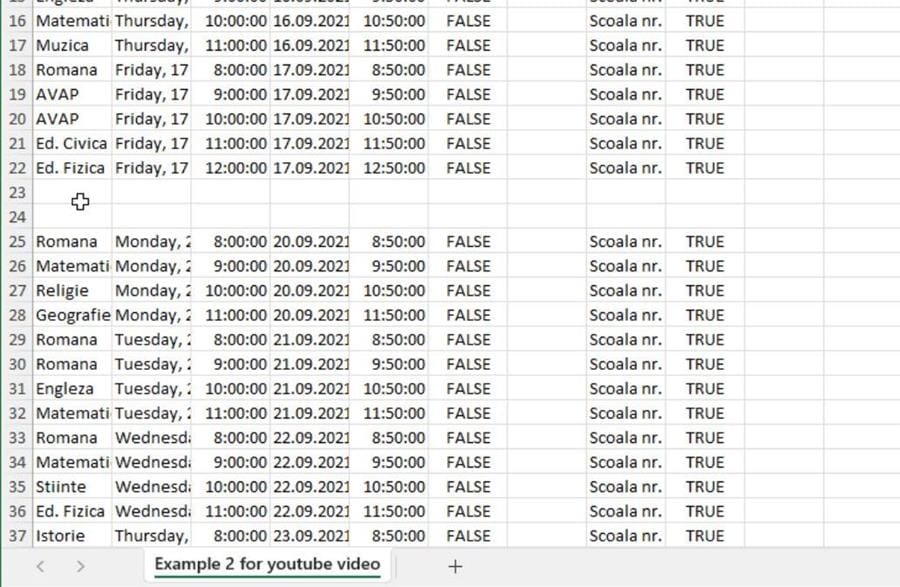
No blank rows in the CSV data
Tip 7: Stick with the allowed fields
One other tip about the header row, if you add a column in here - I've seen students adding columns in here with other data - it's not going to pick it up on the import, just to be clear about that. Those fields that you see are the only fields that Google Calendar allows and to prevent any problems or errors, **keep to the fields that are allowed**.
Import the file into a new calendar
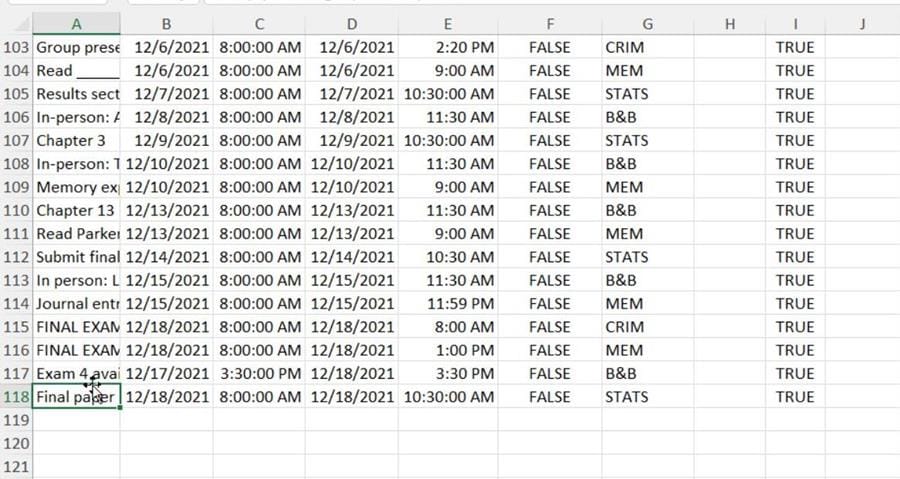
I wanted to test my file because I always like to check and make sure the file I want to import to Google Calendar is formatted correctly. I had a file with 117 events as an example:
**And here's an important tip for you:**
Whenever I import data into the calendar, I first create a separate 'testing' calendar, to prevent from importing wrong data into my main calendar. Google Calendar does not have a function to mass-delete events so if anything goes wrong or events are imported in the wrong dates, etc., I will litter my calendar with a lot of wrong events.
So what I do is, I've got my Google Calendar running. It may be my personal Chris Menard calendar. Even if I wasn't testing, I'd still recommend you import many related events into a separate calendar, such as 'College Calendar' or 'University Calendar', whatever you want to call it.
How to add a new calendar in Google Calendar
- In Google Calendar, go to **Settings and Sharing** \> **Add calendar** > **Create a new calendar.** - Give your calendar a name, I'm going to call it " _College 2022 dates_". - Click on **Create**.

Creating a new calendar in Google Calendar
- Import. In the dialog, go and change it first, so I don't accidentally pull it onto my calendar. Select " _College 2022 dates_." - Locate the file you want to import from, click on **Import**. - There should be my 117 events
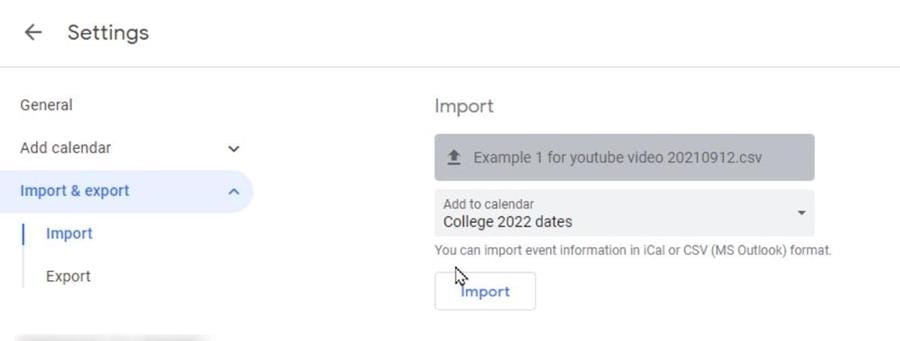
Make sure you select the correct calendar before importing the file
Deleting a calendar
On the Google Calendar sidebar, you have all the calendars, including the one you've just added. You can turn them on and off.
If you want to delete the calendar, maybe you don't want to keep the one you used as a test, it's easy to just to pull up. So now if I wanted to get rid of that calendar, since my tests worked, you click on it and you go all the way to the bottom and there's _Delete_.
Make sure you got the right calendar before you hit _Permanently delete._
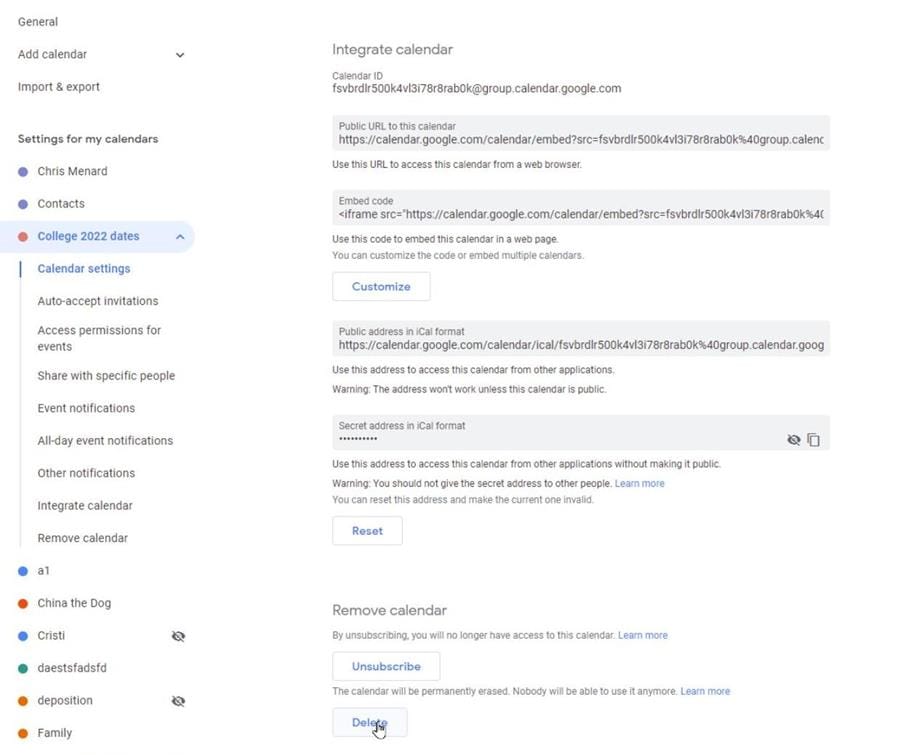
Deleting a calendar in Google Calendar
Watch the video of these tips and [subscribe to my YouTube channel](https://chrismenardtraining.com/youtube)
Import CSV into Google Calendar - 7 Troubleshooting tips | Fix importing problems


